Showing posts with label Nuts. Show all posts

10/18/2020

Cooking Spain Region by Region: The Balearic Islands: Cocarrois or Spinach Pasties


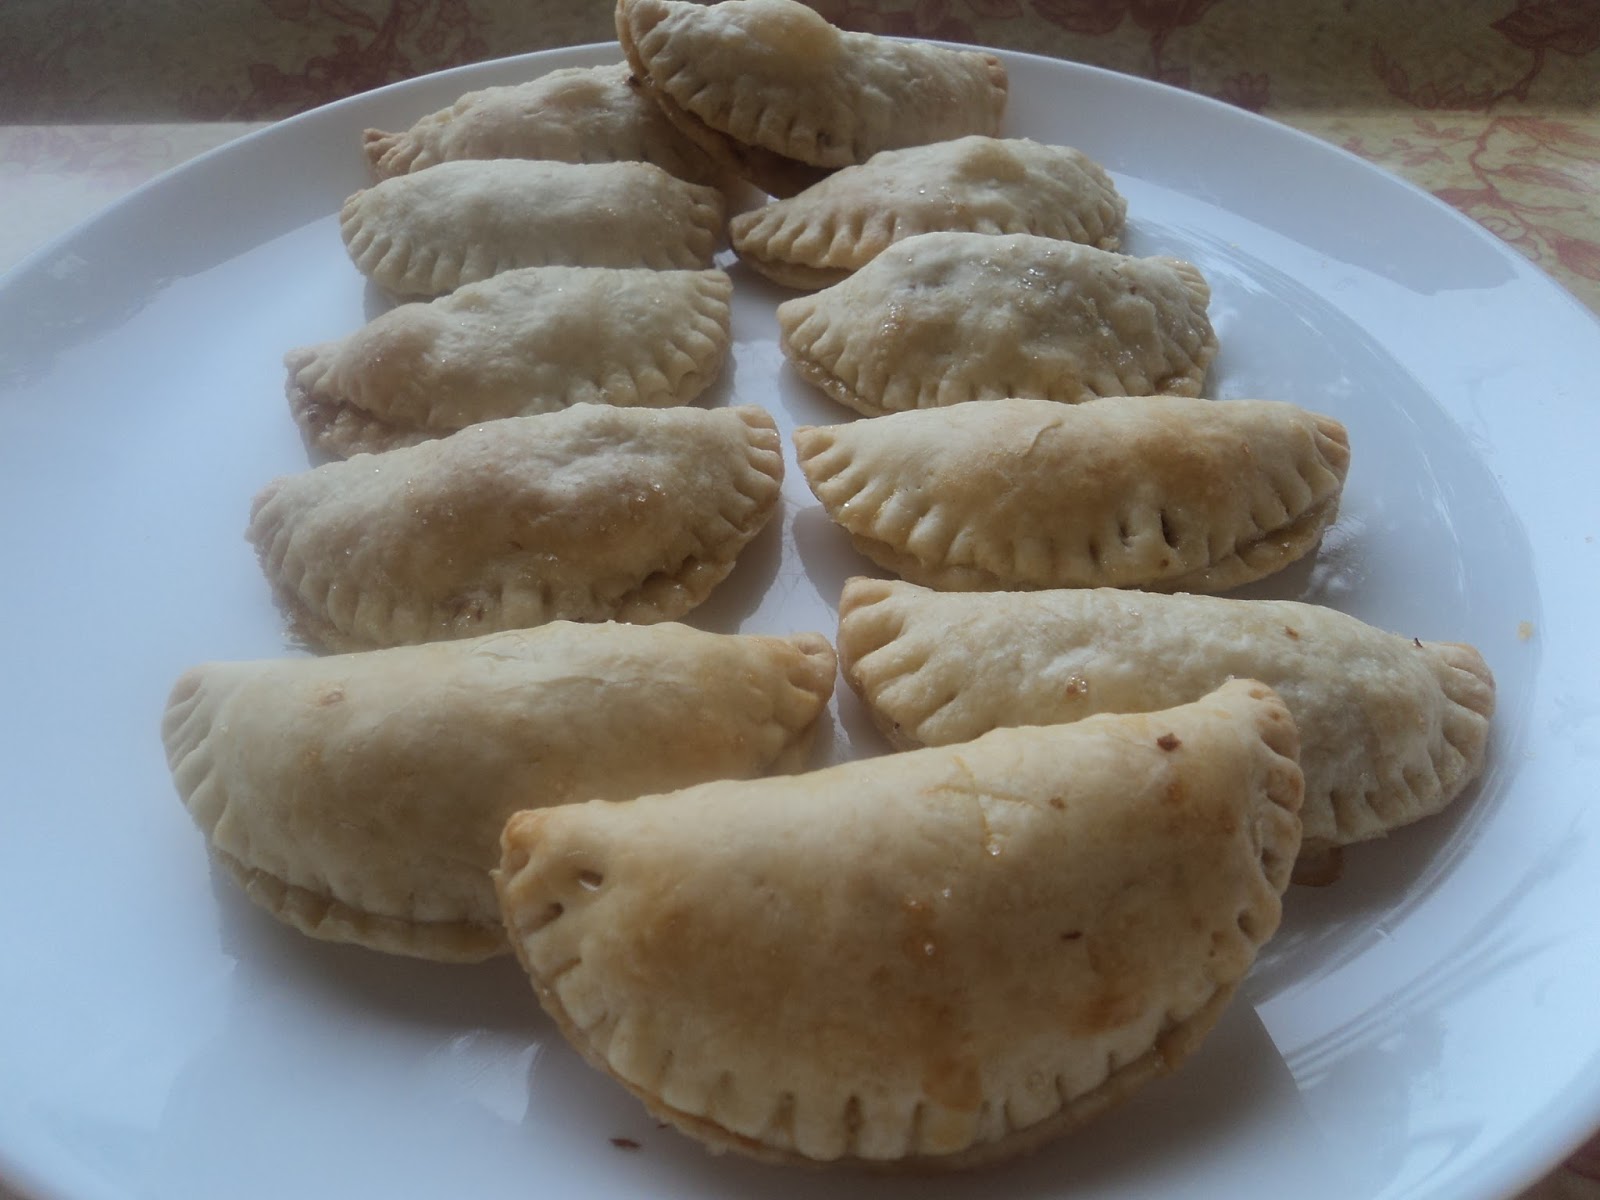
 When you think of the Balearic Islands, you tend to think of beautiful beaches and crystalline waters and you probably aren´t far wrong. The Balearic Islands are formed by Mallorca, Menorca,Ibiza and Formentera. The only island of the Balearic Islands I have been to is Ibiza but I was more into the clubbing scene at that time and typical gastronomy could not have been further from my mind!I don´t recall even seeing these typical spinach pasties, or Cocarrois, let alone trying them. However, I decided to have a go and making them for this month´s Cooking Spain Region by Region and they were definitely worth it.

The pastry was a very short, crumbly pastry made with lard and olive oil, which was new to me and it was filled with spinach, pine nuts, currents and smoky paprika. These could easily be made vegan or vegetarian by using vegetable shortening. I´d definitely make these again even though unfortunately I couldn´t persuade the kids to try them. The recipe is taken and adapted from the book ¨ Las 1000 Mejores Recetas de Cocina¨. I think I halved the recipe which made about 3
  

Cocarrois (serves 4)
 Ingredients:
Pastry:
 400g plain flour
50g lard
50 ml olive oil
40g sugar
50ml water
1 egg
 Filling:
3/4kg fresh spinach
50g currants
40g pine nuts
1tbsp of sweet, smoky paprika
40ml of olive oil
Salt & pepper to season

Method:
1. Mix the egg, lard and olive oil until creamy, then add the sugar and water and mix till combined,add the flour gradually and knead till it has some consistency. Cover and allow to rest for half an hour.
2.Wash the spinach leaves, chop and boil for 10 minutes, then wring as much water out of the spinach as possible.
3. Fry the spinach in a little oil for a few minutes,season with saly and pepper and add the currents, pinenuts and paprika, stir quickly over the heat for a short time.
4. Roll out the pastry..it is quite crumbly so my advice is to roll it out on top of plastic wrap or Clingfilm. Using a small saucer or pizza cutter cut into circles of around 20cm and place filling in the centre of each circle.
5. Double the pastry covering the filling to form a semicircle or pasty shape,sealing the edges of the pasty.
6. Heat the oven to 180/170º C and place ¨Cocarrois¨ or pasties on a greased baking tray and cook for 25 to 30 mins until a pale golden.
7.Serve hot or cold.
Añadir título

2/08/2018

Cook & Learn about the World: Albania Part 1 Albanian Shendetlie or Honey & Nut Cake

 Although I haven´t been doing much blogging lately, I have been trying out plenty of recipes, especially for this Cook & Learn about the World post,in which we´re taking a trip to Albania. Although I don´t really know much about Albania or it´s cuisine, it seems like it´s food is made of simple ingredients that can be found easily in any supermarket or kitchen cupboards! Unfortunately,many of the recipes have eluded me and I haven´t been pleased enough with the results in order to make it worthwhile publishing them. I tried Lamb in Yoghurt but it ended up tasting very strong mutton-maybe it was the cut I used- in scrambled egg, then I made a yoghurt drink, which ended up being thrown away as I didn´t like the salty taste of it.

However, some success was finally achieved when I made the simple Albanian dessert or cake, Shendetlie or Honey & Nut cakes.When it is first baked, the Honey & Nut cake seems more biscuit-like in texture and appearance but after it soaks up the sugar syrup, it takes on a more cake-like consistency. Those who don´t have a sweet tooth may find them a bit too sweet but me and my daughter loved them even though I´m not too keen on nuts. I followed this recipe from the blog My Albanian food, only tweaking it a little,for example making only half the amount of the recipe given and cooking it around 10 degrees less than the temperature given in the recipe so at 170 degrees instead of 180 degrees. I made my Shendetlie with whole walnuts which I roughly chopped although you can also used ground walnuts. Dicovering delicious treats like this is a great way to find out about a country´s culture and cuisine.

Although we are still in the middle of cooking and learning about Albania, here is a link to a page where you can find activities to do with your children so they can find out more about Albania: http://www.wartgames.com/themes/countries/albania.html and also : http://dinolingo.com/blog/2012/11/14/albanian-culture-food-festivals-clothes-and-so-much-more/.So far I have only read my daughter the folk story about Rozafa Castle, although I was surprised that it was a story for children! However, I would like to do some other activities with her to teach her more about this country and as I myself also know very little about it!


10/13/2017

Cooking Spain Region by Region: Asturias: Casadielles (Walnut Pastries)

These have been on my to try list since I started cooking Spain region by region and arrived at Asturias and after trying the real deal while I was on holiday in Asturias, I knew I definitely had to recreate these delicious pastries.

These pastries are stuffed with a walnut paste with warming aniseed spice and served warm...they are a definite delicacy. In Asturias they were served to us in a rectangular shape'however I opted to make them in a pasty form although this might not be the usual traditional shape. I combined two different recipes and the end result turned out to be pretty similar to the ones I tried in Asturias. This recipe makes a lot of Casadielles...in fact I ran out of pastry and to save time I cheated and ended up buying some pastry squares or obleas to use up all the filling!!!Here´s the recipe: 

Ingredients:
1 sheet or half a kg of shortcrust pastry
150g walnuts
150g sugar
1 teaspoon of aniseed
1 teaspoon of water

Method:
1. Prepare the filling by chopping or blitzing the walnuts in a food processor and mix with the sugar.
2. Add aniseed and water and mix to form a dense paste.
3. Roll out the pastry and cut into small circles, fill with nut paste and fold over to make a pasty shape. Don´t overfill as pasty won´t shut properly and filling will ooze out.
4. Press down with a fork on the edges.
5.Place in a preheated oven at around 180 to 170 degreest C for about 20minutes or until golden.
6. Serve warm.

3/08/2017

Eat More Variety Alphabet Challenge: D: D for Dates: Wild Rice with Dates & Walnuts

Hello strangers! Finally back again to bring you this month´s Eat More Variety Alphabet Challenge and we´ve reached letter D. I decided to choose dates for the letter D as it´s something that although I like we hardly eat but now after reading the nutritional and health benefits of eating dates....I think it´s something we´re definitely going to be consuming more often. Plus I have discovered lots of yummy recipes to try!!

First a quick look at some of the nutritional benefits of dates. Dates contain a wide range of essential nutrients and are a fantastic source of potassium.They are rich in dietary fibre, so therefore helps protect the colon mucous membrame from cancer-causing chemicals. They contain tannins which possess anti-infective,anti-inflammatory and anti-hemorrhagic properties.They are also an excellent source of iron. They also have many other health & nutritional benefits which you can read more about here .

The first recipe using dates I decided to try out was this Wild Rice, Dates & Walnuts despite the fact that it isn´t very toddler friendly because of the nuts and even though I suspected that my daughter would not so much as touch it!I thought at first that I´d overcooked the rice as it looked quite clumpy/ mushy but however the end result was delicious and I´m glad I tried it. It is quite reminiscent of couscous and the sweetness of the dates and the crunch of the walnuts gives it added texture and flavour.As predicted though my daughter wouldn´t try it.I adapted the recipe from my New Better Homes & Gardens Cook Book.

Ingredients:(for2-3people)
1/2 chopped onion
1 tbsp butter
1/2-3/4 cup of wild rice,rinsed and drained
1 cup of chopped celery
200ml chicken stock(I used Oxo chicken stock cube)
1/2 cup water
1/4 cup pitted dates,chopped
1/8 cup chopped walnuts(toasted if time)

Method:
1. Cook onion in hot butter for 10 minutes until tender.
2. Add wild rice and cook for 3 minutes while stirring.
3. Add celery ,chicken stock and water and bring to boiling, then reduce heat and simmer covered for about 20 minutes(the original recipe said 40 minutes but mine was ready between 15-20 minutes) until rice is tender and most of the liquid has absorbed(much like a risotto).
4.Stir in dates and walnuts and cook uncovered for 3-4 minutes.
5. Serve as a side dish with chicken or fish.

7/15/2016

The Great British Bake Off Technical Challenge: Bakewell Tart


OMG, I started doing this blog post about 2 months ago at least and didn´t get any further with it!! Things have been really hectic what with birthday parties, ballet shows, parent´s visits etc, not to mention a 10 mnth old screaming baby that is spending more and more time awake and is not happy to be sat anywhere and is constantly disgruntled....hence making it difficult to do anything, let alone blog or even bake and/or cook!!! By the time, I finally get the kids off to bed I´m not so far behind myself as I am constantly knackered!!!
So going to keep this blog post really short but sweet...kind of like me,really....hehehe!!!As I love both Cherry Bakewells and Almond Slices, both of which you can find the recipes on my blog if you click on the links, and as I´ve never actually made a Bakewell Tart before, I decided to make it for this "month´s" Great British Bakeoff Technical Challenge. I wasn´t worried about this bake as I´ve already mentioned I´ve made both Cherry Bakewell tarts and Almond slices which are very similiar and in my opinion fairly easy bakes. I can imagine that they could be more difficult if you didn´t have a recipe to follow though. The hardest part is the shortcrust pastry as it got very sticky and broke quite a lot...I think the best tip I can give you here is to roll it out on top of clingfilm and then place another layer of clingfilm on top of the pastry so it´s between the rolling pin. However, this Mary Berry recipe(click on the link for the recipe) does not disappoint and it is worth the effort as it´s delicious...I´ll definitely be making this again!!As I made it quite awhile ago, I don´t remember if there were any other issues or difficulties in making this bake.

5/09/2015

Cooking Spain Region by Region: Aragon: Rejanes:(Almond Sponge Cake)

 I´m finally back! It´s been awhile,   I´ve been meaning to make this cake for awhile now but I´ve been busy cooking and baking other things,plus I haven´t had much time for blogging. Another reason for my lack of blogging recently is that I have something baking...yes, that´s right...I´ve got my own little bun in the oven!!

I decided to make this cake as I like all the ingredients, although it doesn´t appear to be very well-known. I´ve adapted the recipe from a book from the library about " La cocina de Aragon" although I don´t remember the title very well. Although quite a plain sponge cake, it´s lovely, light and very spongy....I think it´s ideal to have at breakfast and dipping it in your Caola Cao or other chocolate drink..or failing that, to have with a nice cup of tea. It was a big hit with my husband & daughter too!The recipe was a little incomplete as it didn´t give the amount of flour needed, the size of tin needed nor the temperature of the oven so a little bit of guesswork was used but all in all I was quite pleased with how it turned out!

Ingredients:
150g  unsalted butter,at room temperature
150g sugar
8 eggs
150g ground almonds
2 tbsp baking powder
around 70g plain flour(this was where the guesswork came in)

Method:
1. Grease and flour a loaf tin (I think my loaf tin was a little small as it rose quite a bit out of the tin)
2.Separate the yolks and the whites of three eggs, then beat the egg whites till they have stiff peaks and put the yolks to  one side.
3. Mix the ground almonds,sugar and butter(chopped into small pieces) until well combined.
4.Add the 5 eggs and the 3 yolks and mix well, then add the sieved baking powder and flour to the mixture and stir until well combined.
5. Add the egg whites"meringue" and fold gently into the mixture and then pour into the loaf tin.
6. Place the cake in a preheated oven at 160º C(a little guesswork was required here too,I think I started off with the temperature at 170ºC and then lowered it to 160ºC...it got a little golden brown on the outside so I also ended up covering it with tinfoil) and bake for 30 minutes or until a cocktail stick comes out clean when inserted.
7. Leave to cool for 5-10 minutes before removing from cake tin and then leave to cool on a cake rack.


12/05/2014

The Great British Bake Off Technical Challenge: Sachertorte


It´s been awhile since I did a Great British Bake Off technical challenge so it was about high time I did do one and with my husband´s Saint´s day and my birthday looming up, it was the perfect excuse to make this Sachertorte, particularly as my husband is somewhat of a chocoholic!

I have made a Sachertorte once before to a German recipe I´ve got so I wasn´t too fazed with this particular technical challenge as it is much easier than it actually appears. The thing I dreaded the most was piping the word Sacher across the cake as my piping skills are somewhat lacking to say the least!

Mary Berry´s Sachertorte recipe is easy to follow and results in a delicious and professional looking cake,which is lovely and moist.The cake is fairly straightforward to make. Things you have to watch out for is overmixing the flour,I think I did this but I´m not sure how as when I cut into the cake it had various air bubbles in the sponge which has never happened to me before with any cake.Also,the recipe tells you to whisk the egg whites till stiff but not dry so I was a little uncertain as to what this meant and whether I whipped the egg whites to the correct stiffness!

I practiced piping the word "Sacher" a couple of times onto greaseproof baking paper but a plastic wallet would be ideal too before finally piping it onto the cake when I was happy with it. As you can see, it´s not 100% perfect but I was quite pleased with the end result as it´s ain´t half bad for an amateur baker like myself!

7/31/2014

Almond Rissoles

It´s feeling hot, hot,hot! Yes, the temperatures have risen, holidays are almost here and cooking lunch seems so much more of a chore as turning the oven or even the hob on in this heat,just makes you swelter even more!

Today was my daughter´s last day at nursery as she will start school in September and I have a bittersweet feeling about it. I can´t believe how fast the past two years have flown by...she´s growing up way too fast!

Anyway, on to the recipe,this is the second time that I´ve made this recipe and we really enjoy it so thought  I´d share it with you. It´s great as it´s vegetarian so it´s ideal for non-meat eaters and as my daughter is a bit fussy with vegetables, this is an excellent way to eat a vegetarian meal(even if it doesn´t really get any more veggies into her!) plus she likes it,which is also a bonus.YES, it DOES have nuts in it and it is advised not to give nuts to under-fives but as there are no allergies in my family and my daughter hasn´t shown any sign of any food, or more importantly nut, allergies, I don´t see any problem in giving her these rissoles.It´s also a great summer recipe even though you do have to fry the rissoles on the hob, and it´s quite a light dish, especially accompanied with a salad. Here, I accompanied it with an apple & rice salad.The recipe is taken from "The Dairy Book of Home Cookery".

Ingredients(serves 4)
100g ground almonds
175g white breadcrumbs (I made this with less the other day, around 145-150g and they still turned out well!)
1 small onion,grated
3 tbsp frozen or fresh parsley
1/2 tsp mixed herbs
1 egg, beaten
25g butter,melted
pinch of salt & pepper
about 1-2 tbsp milk

Coating
1 egg,beaten
prepared breadcrumbs
1-2 tbsps (roughly) olive oil
50g butter(I didn´t bother weighing,just put a knob of butter in the pan)

Method:
1. Place ground almonds & breadcrumbs in a bowl and add grated onion,parsley and herbs.
2.Add egg and melted butterand mix until combined.Season with salt & pepper.
3. Add milk till mixture comes together and starts to stick,then form into 8 rissoles or little hamburgers.
4. Dip in beaten egg and breadcrumbs till well coated.
5. Place oil and some butter in frying pan and when hot, fry for about 4-5 minutes on both sides or until golden brown on both sides.
6. Drain on kitchen towels and serve.

I think these rissoles are tasty just as they are but adding garlic or some cheese(particularly Cheddar) would maybe just give them an extra dimension! Next time I make them I´ll try it and let you know what I think!


5/12/2014

Cooking Spain Region by Region: Andalucia: Soplillos: Almond Meringues

Originally, I was only going to publish two main dish recipes and one sweet recipe but in the end I thought what the heck, I love desserts and cake..why not do two. While looking into typical Andalusian dishes, I came across this cake or biscuit, which I fancied making as it like a cross between a meringue and a macaron and it does not disappoint.It´s light and airy texture makes you want to go back for more.

. When I said I was going to make soplillos,people looked at me and said "eh?" as they´d never heard of them before.However, they were very successful...everyone who tried them liked them and it is hard to resist eating more than only one. My daughter, who doesn´t always try all the cakes and desserts I make, even ate 4 in one day! They are also fairly simple and quick to make. So, here goes with the last but not least, final recipe for Andalusia and then it´s on to the next region, Aragon. Any suggestions of what I should make?Anyway onto the recipe, which is adapted from a book called something like La Cocina de Andalucia:

Ingredients (makes about 32-35)
150g ground almonds
200g sugar
3 egg whites
Juice and rind of one lemon
A pinch of vanilla sugar

Method:
1. Beat the egg whites while gradually adding the sugar, till it forms stiff peaks or so that when bowl is turned upside down over your head,none falls out.

2.Add the lemon juice and peel, almonds and vanilla sugar and fold them into the meringue carefully, taking care not to knock any of the air out. The mixture will have a very grainy appearance.

3. Line a baking sheet with baking paper and fill a piping bag, fitted with the Wilton 1M nozzle, with the meringue mixture and pipe out evenly sized meringues. Leave enough space between each meringue as they spread in the oven and also don´t pipe them too big as they lose their shape.

4. Place in a preheated oven at 140º C and bake for 25 minutes.

5.Leave to cool..don´t try to take them off the baking paper too soon otherwise they may stick to the paper a little.


7/28/2013

Green Papaya Salad with Prawns and Meat

About two years ago upon my return from my honeymoon in Vietnam, I promised I was going to share with you some Vietnamese recipes but basically it went out of the window and I´ve hardly cooked anything Vietnamese since. One reason being that it´s difficult to find the ingredients where I live and the other being that I just haven´t got round to it.

I have cooked this salad before and enjoyed it so decided to make it again for my mum. It´s a lovely, refreshing salad, ideal for a hot summer´s day,which takes me right back to my honeymoon and the flavours of Vietnam. This salad is a bit of a faff to make though so I don´t do it on a regular basis but it´s great if you want to impress someone or for a special dinner party. This recipe is based on a recipe from the book Delicious Dishes from Vietnam.

Ingredients (for 2-3 people)

1 green papaya (about 450g)....if you can´t get a green papaya,a normal papaya will do
100g -150g pork belly
150g prawns (I think I used slightly less prawns as am not overkeen on prawns)
1 carrot, finely grated
a pinch of chili flakes or 1 jalapeño pepper,seeded,1/2 grated,1/2 minced
2 shallots, thinly sliced and soaked in vinegar for 10 minutes
2 tsp crushed garlic
50g roasted peanuts, crushed
2 tbsp sugar
1 tbsp fish sauce (if you can´t find fish sauce, use soy sauce)
4 tsp salt
2 tbsp lime juice
1/4 cup coriander, chopped
fried shallots or crispy fried onion
1/4 cup vinegar
bag of ready-prepared prawn crackers

Method

1. Peel papaya,remove seeds and grate,add the grated carrot to the papaya.Sprinkle 2 tsp of salt on the carrot and papaya and squeeze out the juices,then rinse and drain well.
2. Wash prawns. Mix 1/4 cup of vinegar with 1/4 cup of water and 1 tsp of salt.Place prawns in a saucepan and boil in the vinegar mixture for 5 mins. I used frozen prawns but still cooked them in this way...if using fresh prawns, peel shells but leave the tails on.
3. Boil belly pork in 1/2 litre of water and 1 tsp of salt  for about 20 mins. When cooked, slice into 3cm long pieces.
4. Mix fish sauce, chili flakes, lime juice,garlic and sugar together.
5. Mix papaya, carrot, prawns, meat,shallots,coriander together with the fish sauce dressing.
6. Sprinkle salad with fried onions and peanuts and place prawn crackers around the salad attractively and enjoy the taste explosion in your mouth.

2/19/2013

Cooking Spain Region by Region:Andalusian Style Chicken (Pollo a la Andaluza)

I have been inspired by the blog Global Table Adventure and also by my desire to learn more about the Spanish cuisine and cook more Spanish meals,mainly so that my husband and daughter can enjoy this part of their culture. I am a particularly fussy person and there are many Spanish dishes that I am not particularly keen on but also there are many Spanish dishes that I don´t know or haven´t tried before so my aim is to cook two main courses and a dessert from each region of Spain.

I decided to kick this exploration of Spanish cuisine off by cooking each region in Spain in alphabetical order,much like in Global Table Adventure so the first region we are starting with is Andalucia. I came across this recipe for Andalusian Style Chicken or Pollo a la Andaluza  in the recipe book,Las 1000 Mejores Recetas de Cocina,liked the sound of the recipe and decided to have a go at making it.It was definitely a good choice, all of us enjoyed it and my husband even paid me the very high compliment that it was "in the top five dishes".it reminds me a little of Pollo a la Pepitoria.This recipe is a keeper and one that will be made again and again although probably at weekends as it takes a bit more preparation than other dishes.So,without further ado,on to the recipe:

Ingredients (4-6 people)
1 whole chicken,already chopped into pieces
1 onion, chopped
2 tomatoes, chopped
4 cloves of garlic
2 hard boiled eggs
1 bay leaf
1 small glass of wine (I used white cooking wine)
1 cup of chicken stock (I used an Oxo cube)
a handful or two of toasted almonds
a generous pinch of saffron
about 1 tbsp of fresh or frozen parsley (I used frozen)
salt and pepper to taste
 olive oil
*My recipe is a bit vague so I had to kind of guess the quantities of almonds, parsley etc but it turned out pretty tasty anyway!

Method
1. Season the chicken pieces with salt and pepper.
2.Place in a heavy based pan with abundant olive oil and fry the garlic cloves whole until golden brown and remove.
3.Brown the chicken in the same oil and remove.
3.Fry the onion in the same oil, then add the tomato. When softened,place the chicken back in the pan.
4.Add the wine and cook on a medium heat.When the wine has reduced,add the bay leaf and chicken stock,add more salt if needed.Simmer.
5.While chicken is simmering,put garlic cloves,egg yolks,toasted almonds, parsley and saffron in a pestle and mortar and grind together and add a little water.
6.Add to the chicken and leave to simmer till chicken is cooked thoroughly, roughly about 1hr-1hr 20 mins
** This recipe is supposed to be for 4 people, it did 3 of us for 3 meals(I froze the leftovers into two batches)although I suppose my daughter only counts as half a person!!!

When I was looking up typical Andalucian dishes, one of the main dishes that kept cropping up was Oxtail or Rabo de Toro and as this is one of my husband´s favourite meals, I am thinking of tackling that dish in the future and as for the dessert,I still haven´t decided yet,some of my choices are alfajores, amarguillos or poleá but would love to hear from any of my Spanish readers and what they´d reccommend.

7/17/2012

Apple & Pecan Chocolate Cake with Chocolate Glace Icing

I made this cake for my husband´s birthday even though it´s not a very birthdayish looking cake but he doesn´t really like buttercream or fondant and in this way, I can also practice my cake decorating skills with chocolate!

This cake is moist and not overly sweet so is great for those who haven´t got much of a sweet tooth. The recipe is taken from the book: Best Ever Chocolate Cakes & Slices by Konemann....however it´s not very 100 Mile!!Here´s the recipe:

Ingredients:
1 cup self-raising flour, sifted
1/2 cup caster sugar
2 tbsp cocoa powder,sifted
2 eggs, lightly beaten
1/2 cup oil (I used sunflower oil)
2 green apples, peeled and grated
1/3 cup of pecans,chopped

Method:
1.Preheat oven to 180ºC. Grease and line a 21x14x7cm loaf tin with baking parchment.
2. Mix flour, cocoa and sugar together, then add the combined eggs and oil and beat until ingredients are well mixed and there are no lumps and mixture has increased in volume.
3. Fold in pecans and grated apple.
4. Spoon into tin and bake for 45 mins or until toothpick comes out clean when inserted.

When cool, you can decorate the cake as desired. Instead of the decoration suggested in the recipe, I made a simple chocolate glace icing, using icing sugar, cocoa and water,which I made by guesstimation and iced the top of the cake with, then I decorated the cake with pecan nuts and Dr. Oetker´s Chocolate Hearts, which can be found in LeClerc.

2/05/2012

Traditional Almond Slices

Although I´m not a huge nut fan, I do like almonds,especially when they are used in anything marzipan-y and as I had quite a lot of almonds left over after making my Christmas Cake, I decided to make these traditional British cakes to use them up. My Gran used to make them as a little girl and I loved 'em.

Almond Slices are very similar to Bakewell Tarts (another fav of mine and that I´ll also be having a bash at making in the future!) only Bakewell Tarts are topped with icing and Almond Slices are topped with almonds. I polished these off almost single-handedly and couldn´t get enough of them and they were fairly simple to make. Here´s the recipe I used, taken from The Dairy Book of Home Cookery and slightly modified:
Ingredients:

1 packet of Short Crust Pastry (you could use homemade pastry which would be even more delicious but to save time I used frozen ready-made)
2 tbsp good quality raspberry jam (I used Bonne Maman and used a bit extra as wanted it to be nice & jammy!)
100g caster sugar
100g icing sugar (sifted)
175g ground almonds
1 egg
1 egg white
1/2 tsp almond extract
blanched,split almonds to decorate

1.Preheat oven to 200ºC/400ºF
2.Grease a baking tray and roll out pastry to 25x15cm and line baking tray with pastry, pinching long edges of pastry up to form a border.
3. Spread jam over pastry base as shown:


4. Mix sugars and ground almonds together and add egg, egg white and almond extract, stirring to form an almond paste.
5. Spread almond paste evenly on top of jam:


6. Sprinkle split almonds on top to decorate:


7.Place in oven and bake for around 25 mins.

8. When golden brown on top, leave to cool. Then cut into 14 slices.


There you have it...exceedingly good cakes...they almost give Mr Kipling a run for his money! ; )


9/09/2010

Easy Chocolate Refrigerator Cake otherwise known as Tiffin

I felt like cooking this the other day as it was one of my favourite treats when I was a child that my Gran made me...In fact, this is actually her recipe. It´s also a treat which is great to make with children due to its easy preparation and it is also very safe as it doesn´t entail too much work with hot ovens or sharp utensils such as knives. Choc-a -block with hazelnuts, raisins,biscuits and chocolate, it´s perfect to drive away those sugar cravings.

Ingredients

6oz (about 170g) crushed digestive biscuits

2oz (about 56g)hazelnuts, chopped

2oz (about 56g) seedless raisins

2oz (about 56g) plain chocolate

2tbsp golden syrup

3oz (about 85g) butter

Method

1. Melt chocolate, syrup and butter in pan over a low heat as shown in the photo:

2. Take off heat, add biscuits, nuts and raisins and stir till combined.

3.Press into a square 7 inch tin, cut into squares, place in fridge and leave to harden.

I think you could maybe try using different types of nuts, dried fruit eg cranberries and different biscuits as variations of this recipe.


Related Posts with Thumbnails