Showing posts with label Fondant. Show all posts

6/24/2013

Peppa Pig cake & some recent bakes


I have been on a mad baking roll recently and I haven´t had time to blog about them,particularly as time is very restricted these days. It was my daughter´s second birthday not long ago and as she is obssessed with Peppa Pig,I decided to make her a Peppa Pig cake,using the buttercream transfer technique I learned on my buttercream course with Fabricando Delicias.I hadn´t practiced or used this technique since and as it was about two or three years ago my memory of how to do it was a little bit rusty, so I had to refresh it by watching some great tutorials I found on YouTube.

I made the cake the day before her "party" and then set to decorating it the day of the party,covering it with fondant, mixing the buttercream and the colours etc.I had a couple of issues covering the cake with the fondant,due to the fondant cracking and tearing.I think this was mainly due to it being a pretty thick cake! I then set to on doing the Peppa Pig figure and piping it all in with a star tip nozzle. All in all,the decorating part took me ages, all morning practically but I was very pleased with the result, even though it wasn´t completely perfect.The worst thing was we had to cancel the party as my daughter had a fever and wasn´t very well and then I started feeling ill later that night so hardly anyone got to see all my hard work before it got cut into!!!

Here are some other recent bakes that I´ve made and am very proud of.
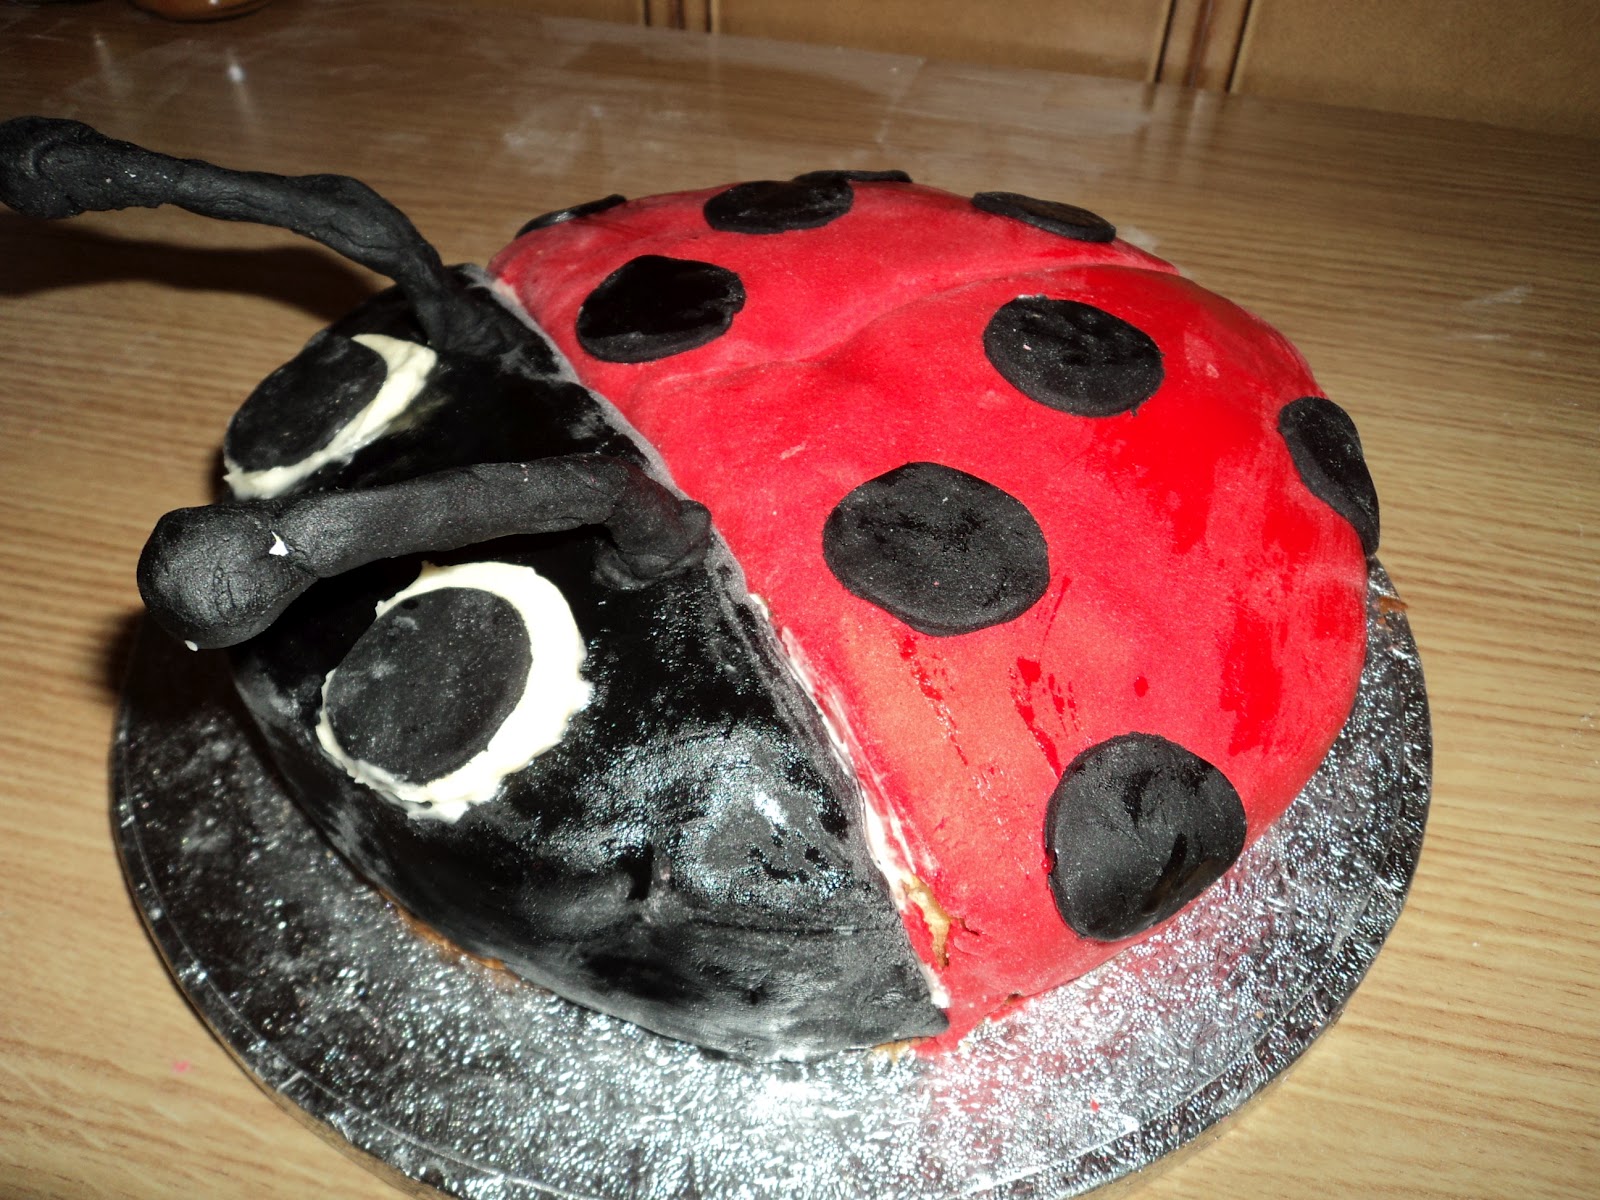
My first red velvet cupcakes with fondant butterflies, a hot milk sponge  cake for my friend´s daughter´s 1st birthday and white chocolate cupcakes with buttercream and embossed fondant hearts.
Hopefully, you can see that I am learning lots of new techniques and improving my cake decorating skills and I´ll try and share these as and when I have the time.


1/29/2013

Under the Sea Cupcake Course with La Dulce Ambar

 At the end of November,I took part in a cupcake course given by La Dulce Ambar here in Ciudad Real....yes,I´ve only just got round to blogging about my experience. It was held in a house in the country,en route to Carrión de Calatrava, the worst thing about this was the fact that it was very cold in the house (and I´m a real frigolerá!!) and despite the fire, my feet were freezing the whole time.Also,because of the fire it was pretty smoky and my clothes and hair really smelt of smoke afterwards.

There were four of us on the cupcake course and everyone was really friendly.It´s great to meet other people who have the same interests as you and to make new friends. La Dulce Ambar aka María was very informative and helpful and  gave us lots of useful hints and tips. She showed us how to make fondant from scratch although I doubt I´ll be doing this very often, due to the lack of time I have to bake and decorate cakes.I´ll probably stick to bought readymade fondant or sugarpaste.
                                       
 She then showed us how to colour fondant. I coloured mine a light purple colour as purple is my favourite colour and it seemed fitting for an octopus.She then showed us how to form the octopus´s head by making a teardrop,elongated shape and then using sugarcraft tools how to shape the mouth and make two tiny nostrils and impressions where the eyes were going to be. We then got two balls of white fondant which we flattened and stuck on to the head, then did the same with two black balls and then an arch shape in blue for the iris of the eye. I did my quite small as I prefer it to look small and delicate although the smaller the fondant you are working with,the tricker it is to work with and handle. A lot of patience is definitely needed in these cases as it can easily break!
We then rolled out 8 even strips of fondant and bent them to form the octopus´s legs, then let them dry before assembling the octopus on top of the cupcake. It probably took us about 1hour at least just to make the octopus but it looked pretty impressive when it was finished so was well worth it! I nicknamed him Ollie the Octopus!                  
We were then shown how to make various buttercream flavours including cream cheese,lemon and Nutella or Nocilla buttercreams.We then turned to piping,not my best skill and one which definitely needs honing. I can´t remember what nozzle we used but I think it was supposed to turn out looking like waves but mine was  more like frills or ruffles:
   We then had a go at piping the cream cheese buttercream.The course lasted about 41/2 hours, from 10-2.30pm and time was fast running out,plus I had to dash as had booked to eat at La Cabina for my birthday. I had to rush putting my octopus together and then María cut a fondant fish and a starfish out to decorate my other cupcakes with but it was great fun and I learnt a lot. We were also presented with a very professional-looking booklet with the fondant, buttercream and cupcake recipes so it was definitely worth the time and money. I look forward to taking part in more of La Dulce Ambar´s cupcake decorating courses!

1/17/2013

My third Christmas Cake

 Life with a toddler is certainly hectic-I hardly have time to cook or bake,let alone blog. I think I may be starting to sound like a broken record though!! I had to make this year´s Christmas Cake while my mum was visiting so she could look after Chloe while I got on with the cake. I decided to try out this Delia Smith Christmas Cake recipe this year, modifying it slightly as I couldn´t get any currants so added more of the other dried fruits plus apricots.


I thought I had dried the cake out a little but over the next couple of weeks until Christmas, it got a liberal soaking in brandy. I didn´t get round to decorating it until Christmas Eve,when we were at my parents´house and my mum could once again take care of Chloe, so I could finish off the cake! The day before Christmas Eve I marzipanned the cake using Dr. Oekter´s ready-to-roll marzipan-no time to make it from scratch just at the moment!- and apricot jam to stick it on.

                                                   
 After leaving it to dry overnight,the following day I made the royal icing and iced the cake, as smoothly as possible! I then cut out some fondant stars with the leftover fondant from my cupcake course and some biscuit cutters and stuck them on the top with a little bit of water.I then decorated the stars and the cake with silver balls. I also stuck a pretty Christmassy ribbon around the cake (I think I added the ribbon directly after icing the cake before adding the stars and silver balls). I think it´s my prettiest Christmas Cake yet and am pleased with the result. i just wish I had more time to practice and make more elaborately decorated cakes!
                                                     
As for the taste of the cake itself, it was a little dry at the ends (my fault or that of my oven!) but lovely and moist in the middle, fruity but not too heavy! I have to say that I think I enjoyed last year´s cake more so I´ll be sticking to that recipe in the future.

1/04/2013

Stars & Moon Cupcakes

December has been a hectic month, what with preparations for Christmas etc,leaving me with little or no time to blog or even to make mince pies and my Christmas cake!!
I just about managed to squeeze in these cupcakes,which I made for a friend´s little boy´s first birthday. The cupcake was a raspberry jammy cupcake, a recipe taken from Hannah Miles´s Big Book of Cakes and Biscuits, with a chocolate buttercream which I found a little too sweet, maybe owing to having run out of Tate and Lyle icing sugar and having to buy a different brand that was actually flavoured with vanilla and not noticing till it was too late! I then coloured some left-over fondant from my cupcake course(this is an upcoming post!) yellow and using my star and moon biscuit cutters,cut out the fondant shapes and placed them on top of the cupcakes and ta-da!!! star and moon cupcakes....made fairly quickly and easily!

6/04/2012

Ladybird cake for my daughter´s first birthday & Annabel Karmel´s white and dark chocolate cupcakes


 I can´t believe my daughter has finally turned one!! The year has flown by and it´s been a busy but enriching one full of joy and happiness. My little baby is no longer a baby,now she´s a little girl! They grow up far too quickly in my opinion.

I was busy preparing her first birthday party,preparing and decorating the Annabel Karmel White & Dark Chocolate cupcakes and making and decorating her first birthday cake, a ladybird cake plus preparing two salads and other party food. Luckily, I had my parents´,my inlaws and my husband´s help but parties are definitely hard work....maybe next year we´ll have the party in a ball pool place so all I have to do is stick to making the cake!!!It also means that I´d actually get to spend more time with my daughter on her actual birthday!

I made the cupcakes on the Friday two days before the party and froze them,then took them out to defrost early on the morning of the party. I made the white chocolate buttercream and decorated them with red heart sprinkles and yellow and white star sprinkles.

The ladybird cake was a Hot Milk Sponge cake made the day before the party. I found this link about a ladybird cake, which helped me a lot. I covered the cake with red and black fondant and cut black fondant circles out for the ladybird´s spots using a bottletop (a great tip from the link I found)! Who says you need fancy equipment to decorate cakes? The leftover white fondant I had was rock hard but as I had a bit of white chocolate buttercream left I used that for the whites of the ladybird´s eyes but unfortunately it wasn´t quite as neat and round as I´d have liked and two more black fondant circles for the pupils. I was going to use pipe cleaners for the antennae but couldn´t find any so used the bendy part of two straws instead. I covered them in black fondant and then made two small balls for the feelers of the antennae. I was pretty pleased with the end result!

4/11/2012

Easter Biscuits 1

Blogging these days is having to take a bit of a back seat as I don´t seem to find the time to do it, much less visit other blogs! Take these Easter biscuits for instance, I made them about a week before Easter but I´m only just getting round to blogging about them now!! They were a recipe again taken from Hannah Miles' Big Book of Cakes & Cookies and contain sultanas and marzipan. As I didn´t have enough icing sugar to make royal icing, I coloured some fondant yellow and decorated the biscuits with that and some silver balls. As you can see, this is only a quick post...I´m hoping to blog about some butterfly cakes I made recently asap!!!


3/28/2012

Mother´s Day Cake


With this Mother´s Day being one of the first I´ve spent with my Mum for a long time and seeing as I´ve never baked her a cake before, I thought I´d make her a Mother´s Day cake from Hannah Miles´ book The Big Book of Cakes and Cookies. However, I couldn´t find shelled pistachios and also all the pistachio´s I could find were salted, plus I wasn´t sure if I´d be able to find organic or free from pesticides roses so ended up making a sponge cake, which I filled with my Lemon Curd. I then made some lemon glace icing, which I iced the cake with (as smoothly as possible), then using some red fondant I had left over from my Valentine´s Day cupcakes, I used my heart plungers to cut out some red hearts which I stuck to the cake and I made a quick fondant rose based on what I had learnt on one of my cake decorating courses. I didn´t use cutters or anything for the rose and it was made in a bit of a rush but I don´t think it turned out that badly. It´s the thought that counts anyway! It tasted pretty yummy though although it was slightly overdone round the edges.....I think my oven thermostat has broken! That´s my excuse at least! Being a mum myself now,I´m finding it quite hard to keep up with my blog and visit other blogs and leave comments so my apologies for that but will try and visit them when I have more time!


2/11/2012

White Chocolate Chip Cupcakes for Valentine´s Day

I´ve been dying to try out my Sugarcraft heart plungers from China,which I bought for Chloe´s Christening cake then never used, so with Valentine´s Day looming up, I thought it was the perfect opportunity! I also had some white chocolate chips from Asda(ordered and brought to me by my mum as you can´t get them here)so thought I´d try out the following White Chocolate Chip cupcakes based on a recipe from my cupcake calender.

I decorated the cupcakes with a simple & quick Glace icing, then coloured some fondant red and set to with the heart plungers,cutting out small,medium and larger hearts,which I stuck on overlapping one another.Once again,very simple but this was more about trying the plungers out etc and I was hoping it would be more striking than it actually turned out! All in all, I was very pleased with the plungers, they were very cheap but did take awhile to arrive, they are very easy to use.My one complaint is that they didn´t always cut the fondant hearts out completely(but then that could just be me!) but I found that if you held the plunger down for a few seconds,you got a neater cut.

Here´s the recipe for the white chocolate chip cupcakes:
Ingredients: (makes about 18 cupcakes)
1 cup butter at room temperature
1 cup caster (superfine)sugar
2 cups plain flour
1 tsp baking powder
4 eggs
1 tsp vanilla extract
1/2 cup (about 100g) white chocolate chips
1/2 tsp bicarbonade of soda (baking soda)

Method
1.Preheat oven to 175ºc (350ºF) and place 18 cupcake cases (I used cases with red love hearts on to ooze more Valentine Day love) in a muffin tray.
2.Stir all cupcake ingredients together except the chocolate chips for 2-3mins.
3.Stir in chocolate chips.
4. Spoon mixture into cupcake cases and bake for 20mins until toothpick comes out clean when inserted.
5. Leave to cool and then decorate.


11/08/2011

Belated Halloween Pumpkin Spider Cupcakes

Although Halloween is long over, I still had some orange and black fondant so I decided to make the Halloween pumpkin cupcakes I made last year as I also had a jar of pumpkin that needed using up too. I actually made these cupcakes last weekend but haven´t got round to blogging it until now!

Using round cookie cutters, I cut out circles of orange rolled fondant and stuck it onto the pumpkin cupcakes using edible glue. I then rolled out the black fondant and using a 16 icing nozzle and a 2 icing nozzle, cut out the head and body for the spider. I then cut thin strips for the legs, which I rolled between my fingers to shape them into spidery legs and stuck them onto the orange fondant-again with the edible glue! I then rolled some small balls of orange fondant for the spider´s eyes. I still have some black and orange fondant left so any ideas of what I can do with it, which aren´t related to Halloween, are greatly welcomed!! Looking forward to next Halloween when Chloe will be able to dress up and join in the fun!!

11/01/2011

Halloween decorated biscuits (in a bit of a rush!)

After ordering the Halloween cutters and the black and orange fondant, they finally arrived and I could set to on making some Halloween decorated biscuits. I made my usual biscuit recipe, the one I used for Chloe´s Christening biscuits but it´s not easy juggling a baby and baking!! It took me all day to make these in between feeding Chloe, having dinner, taking her for a walk etc! Or maybe I´m just slow!!

I was going to decorate the ghosts with royal icing but in the end settled on glace icing as it was quicker to whip up and despite using a spatula instead of piping it on, I think they actually look quite neat!! I made the eyes and mouths with some black fondant and stuck them on with some edible glue. I then rolled out some black fondant and covered the gravestones and bats with black fondant. Using the glace icing, I then piped RIP onto the tombstones, unfortunately as the icing was quite thin, it was very difficult to pipe writing and kept blobbing out and joining up so it was harder to make out what it said(but had to make do as ended up having to rush it all). I then rolled out some orange fondant and covered the pumpkin- shaped biscuits and made eyes for the bats. I then cut out some black triangles and squiggly shapes for the eyes and mouths of the pumpkin and stuck them on with the edible glue again! I think by the time I finished it was 1 am!!

I was planning on doing more detail,like giving the pumpkins green stalks and maybe giving the bats fangs or mouths etc but as it got quite late and I was tired, I didn´t have the energy or the will! All in all though, I don´t think they turned out that bad even though they were decorated in quite a hurried manner!!


9/18/2011

More Christening biscuits & Chloe´s Christening Cake

It´s quite difficult having a baby to find time to bake and furthermore blog about it, especially with Chloe´s Christening just around the corner I´d been busy organising it! As tradition states I had saved the top tier of my wedding cake-it´s a fruit cake so keeps very well particularly in the freezer-for the Christening cake. I took it out of the freezer to defrost 4 days before the Christening. I had planned to decorate it completely myself and had bought white and pink fondant, a smoother, edible glue, heart shape cutters and baby feet cutters. Unfortunately, it all went to pot...I did practice making the baby feet a couple of times and they turned out well, however my fondant had gone past it´s expiry date and was rock hard. Although I tried adding butter to it (I can´t buy shortening here!) and Glycerine, which helped it to become more supple and easier to work with, it was still very difficult to work with and cracked a lot. I also had a go at making some baby bootees which I think would´ve turned out if I hadn´t had the problems with the fondant/gumpaste mixture...they just collapsed and broke before I could stick them together. Luckily my mum had asked Amelia, who had made my wedding cake to make me a topper as a backup plan! She made me a beautiful ballerina teddy, a name plaque and some teddies for the side!

So in the end all I did was re-ice the cake with Royal Icing using the peak method (it´s easier than trying to get it completely smooth and time was of the essence!)with the help of my mum, then we stuck the teddies round the side of the cake and placed the teddy on top of the cake and the bootees and name plaque on the cake board and voíla!What do you think? Very cute,methinks! Will have to have some more attempts at the bootees and baby feet for the next one!!


I also wanted to make some decorated biscuits as favours for the guests even though I set myself up for a lot of work!! I made the biscuits on Thursday night, then using the leftover Royal Icing from the cake, I dyed a small quantity of it pink with red liquid food colouring. Using disposable icing bags and two Wilton no.2. nozzles I outlined the biscuits in white and filled in the bottles and the wheels of the prams. I then filled the prams in and the bottle teats with the pink icing, then on the bottles I piped Chloe´s name and simple designs such as lines for the measures and spots in pink and then on the pram spots and Chloe´s name in white. Practice definitely makes perfect as I think these are my best Christening biscuits to date and writing turned out much better than ever before.


To give my biscuits a more professional touch, my parents and I wrapped them in cellophane and tied them with pink ribbon curled at the end (I´m not really very good at doing these creative things so my parents helped me!!) and they turned out really well in the end! I was pretty impressed with myself! I definitely have to speed up though if I want to do this professionally some time!!


2/27/2011

Baby Feet Cupcakes & my own Kitchen Nightmares!


One of my closest friends gave birth to her first child last week and I´ve been wanting to make some cupcakes to mark the special occasion so out came the apron and the electric whisk today. Unfortunately, like Alma from the blog Objectivo Cupcake I went to my cupboard only to find it bare, like Old Mother Hubbard....well, not exactly bare but I hadn´t realised that I´d run out of icing sugar. Don´t you just hate it when that happens? As it is a Sunday and all the shops are shut apart from a few little shops that sell basic food stuffs such as the imaginatively named Open Shop (which in desperation I tried but to no avail) there was no getting hold of icing sugar!


In the end I ended up having to improvise and this was the start of my Kitchen Nightmare! First of all I whipped up these basic vanilla sponge cupcakes/fairy cakes from Hannah Miles´s book Big Book of Cakes and Cookies, which is why again I haven´t included the recipe. The cakes seem really airy and light. I really love this book and up to now every recipe I´ve tried has turned out perfectly! So far,so good!


I decided to use some leftover Ballena fondant/royal icing from my Christmas Biscuit decorating course so set about melting it in a glass bowl placed inside a pan of boiling water (somehow the water always ends up boiling over and spilling everywhere). I then filled a disposable piping bag with a nozzle but the icing was so hot it was burning my hands. Plus the icing wasn´t coming out of the nozzle so quickly (I think I used too small a nozzle) plus maybe I made the consistency of the icing too thick and it soon started to set. I scrapped that idea and cut the icing bag and then tried to ice the cakes with a knife but as the cakes are so light and spongy, they started to crumble and break.


I then decided on option c....leftover fondant. As it had been stored in the fridge, it was rock hard and took a lot of working and kneading with my hands until it was workable. I then rolled it out finely and cut circles out to cover the top of the cupcakes, using apricot jam to stick it on. Using a decorating brush I applied some water to the pink baby footprints that my Mum had got me from Whittinghams in the UK to stick them onto the fondant. I tried to use my pink icing witing pen to write Congrats but didn´t like how it turned out so ended up leaving them as they were. Sometimes simple is the best anyway! I think I need a lot more cake decorating practice! It´s a good job I enjoy baking/ cake decorating as I spent almost the whole morning making them! The main thing is that hopefully my friend and her husband will appreciate them!

1/14/2011

Christmas Biscuit Decorating Course


Just before Christmas I did another course at Fabricando Delicias, this time about decorating Christmas biscuits, however I haven´t had time to blog them until now! The course was held over two Saturday mornings from 10am to 2pm. Fabricando Delicias provided the biscuits to be decorated, which were delicious by the way, and gave us the recipe of how to make the biscuits. The first week was dedicated to decorating the biscuits with Royal Icing. We bought some ready made royal icing, which you add to boiling water and mix until you get the right consistency for piping...so not too thin and liquidy as the icing tends to run and drip off the biscuits more, but at the same time not too thick as it dries out too quickly. José also showed us how to do my favourite thing of all....prepare your own icing bags with parchment paper! I´m getting better at it now after plenty of practice. I´ll be an expert at it soon! We then decorated the biscuits using different colours of royal icing...an angel, a bauble, two Christmas trees, two Santa faces and a snowman. My favourite ones were the snowman and the green Christmas tree. It was much easier than I expected. The most difficult part is getting the right consistency of the ready made Royal Icing and then when piping as it´s hot, you have to work quite quickly before it cools otherwise it dries up and also so that you don´t burn your hands/fingers!


The following Saturday morning was dedicated to decorating biscuits with fondant. This is more fiddly and takes longer as it takes quite a lot of work to colour the fondant the shade you want. If you were good at clay or plastacine modelling, then you should excel at this! I was never very good at either but with patience and practice, plus a good imagination or pictures to base your decorations on, then they will turn out very pretty. First of all we decorated three of the biscuits as the Three Wise Men, then we decorated one as Father Christmas´s face and finally a snowman snow scene. The only thing is that they look almost too pretty to eat!

11/07/2010

Halloween Pumpkin Cupcakes


These Halloween cupcakes are well overdue now as I made them on Halloween itself for our Halloween party. They are slightly adapted from my cupcake calender and despite the decorating part being a bit fiddly, they went down a treat. With the cupcakes containing pumpkin puree and the addition of spices such as cinnamon and allspice, they are definitely a taste of autumn and Halloween!


Ingredients (makes around 16 medium sized cupcakes)


1 300g jar of pumpkin pieces (it´s very difficult to find here in Spain, I found it in Aldi but nearly ended up having to leave the pumpkin out which wouldn´t have been the same!)(use all pumpkin pieces but only added a little of juice from the jar)


1 1/2 cups plain flour


1tsp ground cinnamon


1tsp baking soda (bicarbonate of soda)


1 tsp baking powder


1tsp allspice


1 1/4 cups sugar (preferably caster)


1/2 cup olive oil (mild is best so doesn´t affect taste of cupcakes)


2 lightly beaten eggs


1/2 cup milk


orange & black fondant


Halloween cookie cutters


apricot jam


Method

1. Puree the pumpkin pieces with a little of syrup/juice from jar in a blender-should make about 1 cup.

2.Preheat oven to 350ºF (175ºC) and place cupcake cases in muffin tray.

3. Mix all dry ingredients together.

4. Beat oil, eggs and milk in a large bowl and add pumpkin puree.

5. Gradually add dry ingredients to wet ingredients and stir till well combined.

6.Spoon into cupcake cases and bake for 20-30 mins (depending on your oven).

7.When cool, brush with apricot jam. Cut out black and orange fondant circles using cookie cutters and stick on top of cupcakes.

8. Using Halloween cookie cutters cut out Halloween shapes in orange and black fondant. Brush with apricot jam and stick on top of fondant circles and voila you have some cute, scary(ish) Halloween cupcakes!


I used some Halloween cookie cutters I got at Target when I was in the USA, which were great for this project.However, it was a little fiddly as you had to cut out the eyes, nose and mouth with a knife so patience was definitely a virtue! Also, the cupcakes didn´t rise very much so I´m not sure if this was due to using olive oil but they tasted great,which is the main thing!


9/27/2010

Fondant Cake Decorating Course


Last week I took part in my first fondant cake decorating course held at Fabricando Delicias. The course was held on Wednesday evening from 5pm to 9pm and Saturday morning 10am -2pm for four hours. It was well worth the money as it cost 50 Euros for the course although you had to pay for the materials apart. Luckily I had quite a few of the decorating equipment & tools already so I didn´t have to spend a fortune.

Unfortunately I had to work on Wednesday evening so missed the first two hours of the course during which they made a snail and a frog....I intend to make these myself at home to practice. We then made a dog and an angel but time flies so quickly when you´re having fun that we didn´t have time to finish the angel and give her wings and hands. We also ran out of time to make the clown, which we could do at home if we wanted. Here are my efforts:

We made the figures out of modelling paste and it was a lot more difficult than I imagined because the modelling paste kept cracking and drying very quickly so you have to work as quickly as possible and keep kneading it to keep it soft and supple and more like Plastaline. I think they look quite cute, don´t you? Obviously I need a lot more practice though! It took me ages to colour the modelling paste at home and even though I wore gloves I still ended up with icing food colour all over my hands and my clown became a little smudged. He looks a bit like a snowman as he´s so white...I still need to give him a hat and a tie and maybe give him some more colour or stripes on his body so he looks less like a snowman!

On Saturday morning we learnt how to make fondant roses, a daisy like flower and a carnation. I think the rose and the daisy turned out well but the carnation was a disaster. More practice definitely needed! We also had to bring a cake to decorate and as I didn´t have time to make one I just bought the sponge bases from the supermarket. We learnt about different fillings you can use in the cakes. I just used raspberry jam to fill my sponge layers like a traditional Victoria sponge cake and then covered the cake in apricot jam to stick the fondant. We also learnt how to work the fondant before rolling it out, how to roll it out and cover the cake. One of the biggest problems was that the fondant tended to stick to the Roll n´Cut Mat and because of this my fondant seemed to tear or crack more easily. However, I think for a first attempt it was not bad. Here´s a photo of my cake with the rose, the daisy (you can just make it out) and the angel on it.


Below is another of the student´s cake decorated with her clown, which was very good and artistic.


The course was very informative and the teacher was very helpful. I´d definitely reccomend anyone interested in cake decorating to do a course. I´m looking forward to the next one about buttercream, which I´ve already signed up for!


Related Posts with Thumbnails