I took part in my second cake-decorating course held at Fabricando Delicias, this time about Buttercream. Our instructor was Jose, one of the owners of the shop, who is a very patient teacher and gave us very clear explanations and demonstrations. The course was held over two Saturdays from 10am-2pm and cost a reasonable 50 euros,plus materials.
In the first lesson, José showed us how to prepare buttercream to various consistencies depending on the type of decorations you were going to use it for (recipes are also included in the instruction booklet to accompany the course). He then showed us how to make icing bags out of baking paper...a little tricky as I´ve never been one for handicrafts! We then learnt how to use the icing bags to pipe stars, a wavy line, tight zigzags, dots and figure piping using plastic templates which we were allowed to keep (great for further practice). We made a face although I didn´t get very far with the hair! He also showed us how to pipe a heart although I didn´t have time to try piping a heart. We also had a go at piping writing, which was also fairly tricky. We were given a muffin ,which we could decorate with buttercream and quite a few of us had a go at using the grass effect nozzle, then decorated the muffins with the faces we´d piped (as you can see in the final photo).
The following Saturday we had to bring a cake with us to decorate. I just made a plain Yellow Sponge Cake but unfortunately I had a bit of a disaster and the cake stuck to the bottom of the cake tin. It was a new cake tin so not sure if that had something to do with it so it was a bit uneven. We also had to prepare Buttercream of two different consistencies but I had another disaster and only brought one kind. I made the stiff consistency to the recipe given in the instruction booklet but it ended up looking like breadcrumbs so I added 2 tbsp milk and it seemed better. However, José said it was too still dense and added water to it till it was much more manageable. I think my problem was that I didn´t leave the butter out of the fridge long enough before making the buttercream.
José showed us how to level off our cakes using a cake leveler and then we piped on the buttercream, then used the spatula to smooth it over. We then practised piping star flowers (for me perhaps one of the easiest things so far!)and swirl flowers, shells (which are also fairly complicated). Using a flower nail, we stuck some sticky tape and baking paper over the nail and practiced making cone shapes, then once we had a half-decent cone, José showed us the next steps of how to pipe a rose. It is really difficult and hardly any of us accomplished a complete rose. You definitely need lots of practice and plenty of patience!
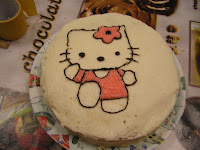
We then went on to decorate our cakes, a bit on the rushed side as time was running out. With piping gel, which is much easier to pipe than buttercream, we traced the outline of a Hello Kitty template and then placed it on top of the cake and using a wet paintbrush went over the lines till the pattern was traced on the cake. Then, with chocolate or black buttercream we piped the outline. As we were running short of time, I also piped the eyes and nose in chocolate buttercream. Then, using the star nozzle and pink buttercream, I filled in the dress and flower with pink stars and voíla a fairly impressive Hello Kitty cake for a novice cake decorater (as can be seen in the first photo above)! The middle photo is of the teacher, José´s cake! Using a piping bag is very difficult as I´ve found out and my common problem was that I often held the bag too high up, which meant I had to use more force than necessary to squeeze out the buttercream. My hand and wrist were often aching by the end of the course! Or maybe I just need more strength!
I took part in my second cake decorating course at Fabricando Delicias


No comments:
Post a Comment
Hi! Please feel free to leave your comments-would love to have any feedback-thanks!