11/06/2013

Individual Apple Crumbles

 Blogging seems to be taking rather a backseat at the moment as I can hardly find a spare minute to write,particularly as my daughter very often doesn´t go to sleep till after 11.30pm!!
I have been baking loads recently though but again finding time is difficult...I have to get up extra early and try to finish before my daughter wakes up. I had a lot of surplus apples so decided to make apple crumble to try and use some of them up but instead of making one huge apple crumble,which would mean a lot of eating up, chose to make smaller, individual ones,based on the following recipe:
 http://irreverentbaker.wordpress.com/2012/06/30/mini-apple-crumbles/. I also chose to use wholemeal flour and oats to make the dessert just that tiny bit more healthier and surprizingly enough you couldn´t tell the difference.It was just as tasty as traditional apple crumble,if not more!! Also as the apples from my tree are very small, I probably used between 8-10 apples!!Try it, I´m sure you´ll enjoy it and it´s so easy and quick to rustle up this family favourite dessert!

9/04/2013

Healthy Banana & Oat Muffins

I´m on a bit of a healthy eating mission at the moment and when I saw these muffins, I knew they´d be perfect as they are very healthy and full of goodness. Even more to the point, I thought they might tempt my daughter to eat some breakfast as she has become rather picky at breakfast. These muffins are an ideal wholesome breakfast and a great way to get some fruit and cereal down your children and what´s more they don´t even contain any sugar....although I have to say, it didn´t quite work with my daughter. She nibbled at them but didn´t tuck into them in quite the way I was expecting and hoping!!!

 I got the recipe from "365 Recetas para bebés y niños en edad preescolar" and I pretty much followed the recipe to the letter. Unfortunately, I myself don´t like banana so I don´t know how they actually turned out but both my husband and a friend seemed to enjoy them, even if my daughter didn´t.

Here is the recipe for about 8-10 small muffins:

Ingredients:

25g unsalted butter
3 tsp of clear honey
2 large,ripe bananas
100g flour
50g rolled oats/porridge oats
1 tsp baking powder
1/2 tsp bicarbonate of soda
1/2 tsp cinnamon
75ml milk
Method:
1.Preheat the oven to 190ºC and fill a muffin/cupcake tray with muffin or cupcake cases.
2. Heat the butter and honey on a low heat till melted.
3. Mix all the dry ingredients together.
4. Mash the banana up with a fork and add to the honey mixture, then add this and the milk to the dry ingredients.
5. When well-combined, pour the muffin batter into the cases and bake for 25 mins (Note: temperature and time may vary depending on your oven....I baked mine at 180º for 15-20 mins) or until muffins are a golden brown and a toothpick comes out clean when inserted.


7/28/2013

Green Papaya Salad with Prawns and Meat

About two years ago upon my return from my honeymoon in Vietnam, I promised I was going to share with you some Vietnamese recipes but basically it went out of the window and I´ve hardly cooked anything Vietnamese since. One reason being that it´s difficult to find the ingredients where I live and the other being that I just haven´t got round to it.

I have cooked this salad before and enjoyed it so decided to make it again for my mum. It´s a lovely, refreshing salad, ideal for a hot summer´s day,which takes me right back to my honeymoon and the flavours of Vietnam. This salad is a bit of a faff to make though so I don´t do it on a regular basis but it´s great if you want to impress someone or for a special dinner party. This recipe is based on a recipe from the book Delicious Dishes from Vietnam.

Ingredients (for 2-3 people)

1 green papaya (about 450g)....if you can´t get a green papaya,a normal papaya will do
100g -150g pork belly
150g prawns (I think I used slightly less prawns as am not overkeen on prawns)
1 carrot, finely grated
a pinch of chili flakes or 1 jalapeño pepper,seeded,1/2 grated,1/2 minced
2 shallots, thinly sliced and soaked in vinegar for 10 minutes
2 tsp crushed garlic
50g roasted peanuts, crushed
2 tbsp sugar
1 tbsp fish sauce (if you can´t find fish sauce, use soy sauce)
4 tsp salt
2 tbsp lime juice
1/4 cup coriander, chopped
fried shallots or crispy fried onion
1/4 cup vinegar
bag of ready-prepared prawn crackers

Method

1. Peel papaya,remove seeds and grate,add the grated carrot to the papaya.Sprinkle 2 tsp of salt on the carrot and papaya and squeeze out the juices,then rinse and drain well.
2. Wash prawns. Mix 1/4 cup of vinegar with 1/4 cup of water and 1 tsp of salt.Place prawns in a saucepan and boil in the vinegar mixture for 5 mins. I used frozen prawns but still cooked them in this way...if using fresh prawns, peel shells but leave the tails on.
3. Boil belly pork in 1/2 litre of water and 1 tsp of salt  for about 20 mins. When cooked, slice into 3cm long pieces.
4. Mix fish sauce, chili flakes, lime juice,garlic and sugar together.
5. Mix papaya, carrot, prawns, meat,shallots,coriander together with the fish sauce dressing.
6. Sprinkle salad with fried onions and peanuts and place prawn crackers around the salad attractively and enjoy the taste explosion in your mouth.

7/10/2013

Malteasers cake

My husband´s birthday was looming and I was searching for a cake that I could make him as he´s not keen on fondant or buttercream (I didn´t realise at first that this cake also has buttercream!!) so I usually make him a chocolate cake.Not really an easy feat to decorate as his birthday falls in July and it´s so hot that everything melts!! I had been wanting to make this cake ever since I first saw it on a fellow blogger´s blog, Baking Cakes Galore, so now was the perfect excuse.I want to dedicate this recipe to Rosie from Baking Cakes Galore as she was very inspiring and also very encouraging in the early days of this blog.

I cannot take the credit for this recipe because as mentioned,I saw the recipe on Baking Cakes Galore and pretty much followed it to the letter.Two things to note when making this recipe, I´d never realized before how difficult it is to find and buy Malteasers where I live. My husband had to buy me two packets from a vending machine at the university because I couldn´t find them in any of the shops. Plus he could only get white whereas I had wanted to alternate white and milk chocolate Malteasers on top. Also, because it has been so hot lately I was worried about the Malteasers and the buttercream melting so put the cake in the fridge, which probably dried it out a little!On the whole though this cake was delicious and I shall be making it again in the future!

As I said, I hardly changed anything in the recipe although I couldn´t really taste the Horlicks in the cake itself so next time I might add extra Horlicks. Horlicks is a malted milk drink sold in the UK but Ovaltine is also very similar...unfortunately I don´t think there is a similar alternative in Spain! I´d be grateful to any Spanish readers to let me know if there is something similar. You can probably buy it online or in British food shops in Madrid or Barcelona or along the coast!!The recipe also states two 37g bags of Malteasers, I only used one of the bags as often I tend to think that less is more!

6/28/2013

The Great British Bake Off Technical Challenges Challenge: Hot Lemon Soufflé

I love The Great British Bake Off, in fact I am obssessed with it and can´t wait to see the new series in August! It has inspired me even more to become a much better baker than I currently am and to persue my dreams so in order to try and achieve both these things, I´ve decided to challenge myself to bake all the technical challenges from all of the various seasons myself and chart my progress here on this blog. Some of the technical challenges I have actually baked already (but not many!) and I want to follow the exact recipes that the Great British Bake Off contestants had to follow.

So here is one of the first technical challenges I decided to tackle: Lemon Soufflé. This was the very first time I´d tried to make any sort of soufflé before and soufflés are renouned for being a little tricky. However, I followed the recipe very carefully and was pleasantly surprised that they aren´t really all that difficult after all. I halved the recipe so it served only two people and whether my ramekins are bigger or what, I don´t know but the souffle mixture didn´t completely fill them up. I made these awhile ago but I don´t remember having any particular problem. I  think I took the soufflés out of the oven just a tad too early, because as you can see in the photo, the soufflés sunk a little although on the whole, I was very happy with my first attempt at a soufflé. The soufflés themselves are lovely and light, with a sharp,lemony burst. Absolutely delicious!We gobbled them up and could easily have eaten more! I´ll definitely be making these again and perfecting my soufflés!If I were you, forget about your soufflé hang-ups and go and try this recipe! It really is a winner!

6/24/2013

Peppa Pig cake & some recent bakes


I have been on a mad baking roll recently and I haven´t had time to blog about them,particularly as time is very restricted these days. It was my daughter´s second birthday not long ago and as she is obssessed with Peppa Pig,I decided to make her a Peppa Pig cake,using the buttercream transfer technique I learned on my buttercream course with Fabricando Delicias.I hadn´t practiced or used this technique since and as it was about two or three years ago my memory of how to do it was a little bit rusty, so I had to refresh it by watching some great tutorials I found on YouTube.

I made the cake the day before her "party" and then set to decorating it the day of the party,covering it with fondant, mixing the buttercream and the colours etc.I had a couple of issues covering the cake with the fondant,due to the fondant cracking and tearing.I think this was mainly due to it being a pretty thick cake! I then set to on doing the Peppa Pig figure and piping it all in with a star tip nozzle. All in all,the decorating part took me ages, all morning practically but I was very pleased with the result, even though it wasn´t completely perfect.The worst thing was we had to cancel the party as my daughter had a fever and wasn´t very well and then I started feeling ill later that night so hardly anyone got to see all my hard work before it got cut into!!!

Here are some other recent bakes that I´ve made and am very proud of.
My first red velvet cupcakes with fondant butterflies, a hot milk sponge  cake for my friend´s daughter´s 1st birthday and white chocolate cupcakes with buttercream and embossed fondant hearts.
Hopefully, you can see that I am learning lots of new techniques and improving my cake decorating skills and I´ll try and share these as and when I have the time.


6/06/2013

Eating local:Sourcing local produce & becoming green~fingered

I‘ ve been meaning to do another 100 mile post for awhile but just haven‘t managed to get round to it, what with so many other posts crying out to be written!
As the economy in Spain is going through a bad patch at the moment and things seem to be going from bad to worse, one way we can all help out is by buying food locally and in this way, helping the local economy and cutting down on food miles. However, sourcing local produce can be quite difficult as I have come to realise as you may not have the time to visit different supermarkets or go directly to the local supplier particularly if you are a working mum!
 Granja Real,is a local supplier of fresh meat such as turkey,chicken and other meat.They also sell sausages chorizo, prepared hamburgers, black pudding, pinchos morunos (meat kebabs)spare ribs and lomo (pork loin) and even eggs. You can find their products in some supermarkets such as LeClerc or El Pollo Feliz (for some reason LeClerc doesn´t sell their eggs only their meat but you can find their eggs in El Pollo Feliz or Covirán.For information about Granja Real,click on the link provided.

I have to admit that I haven´t been buying so locally,not even many of the products mentioned in my previous  Eating Local post,mainly for example things like milk I prefer to buy in cartons,not in bags and although I´ve been checking the labels,most food I buy is not produced in Castilla La Mancha!It´s very difficult to find locally produced food at least in the supermarkets although I could be wrong!

Another way you can cut down on food miles and make sure you are getting fresh and organic produce is by growing it yourself! Don´t let the fact that you might not have a garden, stop you! If you have a balcony however little it is, you can grow some herbs or even fruit or vegetables and even if you don´t have any outdoor space,you could grow some herbs indoors on the window sill! I´ve never really been much of a gardener but this year I´ve decided to try and grow a few herbs on my balcony so that I have fresh herbs and also because when I buy herbs from the supermarket, I only use a little of it and then it goes off or dies!! So far, I am trying to grow rhubarb....it was doing well till I replanted it and one stalk died and another leaf has gone a bit yellowy-not sure if it´s the heat or if I´ve been overwatering it, coriander.....it has flowered now so I think it´s going to die but I´m going to let it go to seed,then I can use some of the seed as dried spices and plant the rest!I also have basil,however it died almost straight away so I have bought another plant to see how that goes on and also oregano,which seems to be doing well at the moment.I have also picked some bay leaves from a tree at my inlaw´s house so again it is local!If you would like to have a go at growing your own but haven´t got any outdoor space, you could always rent an allotment space at Las Huertas Ecologícas.

In both Eroski and Carrefour there are sections selling local food from Castilla La Mancha,however in Carrefour there is only a small range of products and in Eroski, it is mainly limited to patés, wine,cheese and tinned goods such as pisto,asadillo etc.

I will continue trying to souch more local produce and buy as locally as possible although it seems like a pretty difficult task!

4/29/2013

Pineapple & Lemon Upside-Down Pudding and my new page


Sunday has officially now been declared as Pudding Day in my house! My daughter isn‘t accustomed to eating desserts, apart from fruit and yoghurts, and I thought it would be nice to have a dessert once a week. Any excuse to have a dessert, right?At the same time, I also get to practice and improve my baking skills...and in fact to stretch my baking skills I´ve also decided to bake each of the technical bakes from the hit TV baking programme, The Great  British Bake Off. I´ll be posting about my experiences baking the technical challenges!
Anyway though back to the Pineapple and Lemon Upside-Down Pudding...I decided to make this because I just happened to have all the ingredients lurking in my cupboard,waiting to be used up and I was also hoping that it´d encourage my daughter to eat pineapple!What a great choice of pudding!! It was lick the bowl and spoon delicious....me and my husband devoured it in one sitting and my daughter didn´t even get a look in (no, we did try to give her some and she had a little nibble but I think she was too full from her lunch for any dessert....all the more for us!!!)

Before I get onto the recipe, one of the reasons I haven´t been posting too much on here is because I´ve set up a page ....yes,now you can follow me on Facebook too!!However, it´s not completely related to this blog but more to baking and above all,cakes, so you will see many of the cakes,biscuits etc(including this pudding!)from the blog and others that I haven´t got round to posting and may never get round to posting! You can find my page, Sweet Tooth Bakes, on Facebook...please come and have a look and at the same time press like ; ) The other reason is finding time to blog along with everything else!!!

Here´s the recipe adapted from The Dairy Book of Home Cookery.

Ingredients:(for 2-3 people)
base: 25g butter
       25g soft brown sugar
       1 small can of pineapple rings
Sponge Pudding: 100g self-raising flour
                          1/8 tsp salt
                           50g butter
                           50g caster sugar
                          Grated rind of 1/2 lemon
                          1 large egg
                           2-2 1/2 tbsp cold milk
Method
1. Prepare the base by melting butter and sugar together and pour into a greased Pyrex bowl and arrange pineapple rings on top of the base and around the sides of the bowl.
2. Sift flour and salt into a bowl and rub the butter in until it looks like breadcrumbs.
3.Add sugar and lemon rind and combine,add the milk and egg  and mix to form a soft batter.
4.Place in a preheated oven of 190ºC/375ºF and bake for 30 minutes, then lower the temperature to 180ºC/350ºF and bake for a further 35-45 minutes until a wooden cocktail stick comes out clean,when inserted.
5.Leave in dish for 5 minutes before turning it out onto a plate and serve with cream, ice-cream or custard!


4/16/2013

Char Siu Pork

I love Chinese and funnily enough one of the things I miss from good old Blighty is good Chinese food as Chinese food here in Spain is somewhat lacking in taste or in quality although it is cheap!One of my favourite dishes is Char Siu Pork, a dish which so far has proved impossible to find here (the Spanish don´t know what they are missing!!!)so when I came across the following recipe on fellow blogger Debs´s blog The Spanish Wok, I thought I´d give it a try.

Oh Boy,am I glad I tried it!Deb´s recipe is simple and easy to follow and the result is tasty, succulent pork oozing with  flavours such as five spice and hoisin sauce, really reminiscent of your local Chinese takeaway back in the UK!! I teamed the Char Sui pork with Annabel Karmel´s Vegetarian Nasi Goreng and this is a winning dish that everyone can enjoy,even my daughter loved it!!This will be a regular dish in our house from now on!

3/24/2013

Dublin Coddle for St. Patrick´s Day

Over the St.Patrick´s Day weekend,I decided to make something typically Irish and despite never having heard of or having tried Dublin Coddle, thought it sounded pretty tasty and since I had all the ingredients to hand, went ahead and made it.

Although maybe not the healthiest meal, it is certainly a very tasty one and it is a pretty easy and fairly quick meal to prepare. It is also suitable for toddlers and my daughter really enjoyed it, particularly the sausages, which she wolfed down. This is yet another dish that I will be adding to my monthly repertoire (the only reason  it won´t make a more frequent appearance is due to it not being the healthiest of meals!)

I adapted the recipe from the book Cocina Irlandesa by Anne Wilson and tried to make it a little healthier.  
I´m not sure how traditional this version of the recipe is!Apparently, it was traditionally eaten on a Saturday night.

Ingredients (for 3-4 people)
 7-8 pork sausages
4 rashers of bacon (I used smoked bacon)
1 onion, finely chopped
1-2 cloves of garlic, crushed
3 medium-sized potatoes, thinly sliced
1/4 tsp dried sage
a pinch of ground black pepper
3/4 cup of chicken stock
2 tbsp frozen parsley
olive oil

Method
1. Cook the sausage and bacon on a non-stick griddle pan,brushed with a little olive oil,till a golden brown colour.
2.Fry the onion and garlic until tender and add the bacon,cut into strips.
3.Place the potatoes in a shallow casserole dish and add a layer of garlic,onion and bacon.
4.Sprinkle the pepper and sage over it and then pour the chicken stock over everything.
5.Place the sausages on top and add the parsley.
6.Cook in a preheated oven at 180ºC for an hour until potatoes are cooked through and serve warm.Enjoy!

3/14/2013

Cooking Spain Region By Region: Andalusia: Polea or Gachas Dulces (Andalusian Sweet Porridge?)

When doing a little bit of research into typical dishes of Andalusia in order to choose which ones to try and cook, I came across this dessert, Polea,which I´d never heard of before. I decided to have a bash at making this dessert as it seemed unusual,what with having croutons in it etc plus it piqued my curiosity. I was a little bit apprehensive at the same time too as I wasn´t sure whether I´d like it because I´m not too keen on  savoury gachas. However, I´m soooooooo glad I decided to make it as it is absolutely delicious, even if I do say so myself! ; )

It has a lovely lemony, milky,cinnamon flavour with a hint of aniseed and is surprisingly light. I served it warm but I think it´d be nice both hot and cold. I´m so pleased I found this dessert as it has quickly become one of my favourite Spanish desserts and I prefer it to flan,natillas or crema catalana. I really don´t know why this isn´t on more restaurant menus for dessert!!I will definitely be making this on a regular basis...in fact I am thinking of making it for a Father´s Day meal for my hubby as he really enjoyed it too but unfortunately my daughter didn´t get round to trying it...maybe next time!!It is really quick and easy to make too, despite being  a fairly easy dish to prepare for some reason,it didn´t thicken up and was still quite thin and liquidy...probably because I didn´t mix the flour in the milk.I ´ve adapted the recipe from the original recipe from Gallina Blanca.

Ingredients (for 2)
 1/2 litre of milk
1 tbsp mild (suave) olive oil
2 1/2 tbsp sugar
grated rind of 1/2 lemon
1 cinnamon stick
1/4 tsp of dried aniseed or fennel seeds (I didn´t have aniseed so used fennel seeds as they still have that aniseed flavour)
ground cinnamon
ready made or home made croutons (I used ready made croutons,just to save time)

Method
1. Heat the olive oil and add the aniseed or fennel seeds and cook for a couple of seconds over a low heat, making sure they don´t burn.
2. Dissolve half of the flour in the milk and then add to the pan.
3.Add the sugar,the rest of the flour,the grated lemon rind,the cinnamon stick and a pinch of cinnamon and cook over a low heat till it starts to thicken, stirring the whole time.
4. Once thickened, remove from heat and pour into serving dish and add the croutons and sprinkle with ground cinnamon according to your taste.
5.Serve and enjoy!

3/10/2013

Traditional Queen of Puddings

 I´ve been on a bit of a baking roll lately, trying to hone my skills and bring a taste of home to my kitchen so Sundays have now become dessert day!!

I´ve never tried Queen of Puddings before and had planned to make one of my favourite desserts,Sticky Toffee Pudding, but as I didn´t have enough soft brown sugar and I had all the ingredients on hand for this dessert,Queen Of Puddings it was!!I really enjoyed it too as the sponge has a lovely lemony kick to it and it is quite a light pudding. Plus it meant I got to practice my piping skills a little!!

                                                     The recipe is taken and adapted from the book, The Dairy Book of Home Cookery. I halved the original recipe so that it only served two.

Ingredients (for 2)
37g fresh white breadcrumbs
12g caster sugar
grated lemon rind of 1/2 lemon or about 1/2 tsp
225ml of cold milk
12g butter
Yolk of one large egg
1 tbsp warmed raspberry jam
White of one large egg
                                                      25 -37g caster sugar
                                                     
Method
1.Place breadcrumbs,sugar and lemon rind in a bowl and mix.
2.Place butter and milk in a pan and cook over a low heat until the butter has melted.
3.Pour onto breadcrumb mixture and stir till well combined and leave to stand for 30 mins,then beat in the egg yolk.
4.Place in a small glass bowl and place in preheated oven  at 160ºC/325ºF and bake for around 30 mins until sponge is a light golden colour.
5.Prepare the meringue topping while sponge is cooking by whisking egg white until stiff and peaky and when the bowl is placed upside down,it doesn´t fall out.Fold in the caster sugar gently and spoon into a piping bag.
6. Pipe meringue peaks on top of the pudding,then return to the oven and bake for a further 30-40 mins or until meringue is a pale golden brown colour.

2/24/2013

Simple and Quick Garden Insect Cake

 I offered to make my friend´s daughter a birthday cake but didn´t want to make a cake that would take too long or be too complicated to make, especially the decorating part,seeing as I have relatively little time to bake.Also the lack of fondant etc played a fundamental part in my idea for this cake.

I chose to make Delia Smith´s All-in-One Sponge (this is more or less the recipe I used minus the butter icing), which I flavoured with lemon rind and juice and then filled the cake with raspberry jam and fresh whipped cream. I then made a Lime Velvet Frosting and had a slight disaster,which I managed to rectify and coloured it a mint green colour to represent the grass. I iced the cake with a spatula and tried to get it as smooth as possible. I blasted about 5 Oreo cookies in a food processor for a couple of seconds till they were crushed and looked like "soil". I then sprinkled the "soil" over half the cake,then placed some worm sweets in the soil and some chocolate ladybirds on the grass and there you have it,a very simple and quick birthday cake that looks pretty.

2/19/2013

Cooking Spain Region by Region:Andalusian Style Chicken (Pollo a la Andaluza)

I have been inspired by the blog Global Table Adventure and also by my desire to learn more about the Spanish cuisine and cook more Spanish meals,mainly so that my husband and daughter can enjoy this part of their culture. I am a particularly fussy person and there are many Spanish dishes that I am not particularly keen on but also there are many Spanish dishes that I don´t know or haven´t tried before so my aim is to cook two main courses and a dessert from each region of Spain.

I decided to kick this exploration of Spanish cuisine off by cooking each region in Spain in alphabetical order,much like in Global Table Adventure so the first region we are starting with is Andalucia. I came across this recipe for Andalusian Style Chicken or Pollo a la Andaluza  in the recipe book,Las 1000 Mejores Recetas de Cocina,liked the sound of the recipe and decided to have a go at making it.It was definitely a good choice, all of us enjoyed it and my husband even paid me the very high compliment that it was "in the top five dishes".it reminds me a little of Pollo a la Pepitoria.This recipe is a keeper and one that will be made again and again although probably at weekends as it takes a bit more preparation than other dishes.So,without further ado,on to the recipe:

Ingredients (4-6 people)
1 whole chicken,already chopped into pieces
1 onion, chopped
2 tomatoes, chopped
4 cloves of garlic
2 hard boiled eggs
1 bay leaf
1 small glass of wine (I used white cooking wine)
1 cup of chicken stock (I used an Oxo cube)
a handful or two of toasted almonds
a generous pinch of saffron
about 1 tbsp of fresh or frozen parsley (I used frozen)
salt and pepper to taste
 olive oil
*My recipe is a bit vague so I had to kind of guess the quantities of almonds, parsley etc but it turned out pretty tasty anyway!

Method
1. Season the chicken pieces with salt and pepper.
2.Place in a heavy based pan with abundant olive oil and fry the garlic cloves whole until golden brown and remove.
3.Brown the chicken in the same oil and remove.
3.Fry the onion in the same oil, then add the tomato. When softened,place the chicken back in the pan.
4.Add the wine and cook on a medium heat.When the wine has reduced,add the bay leaf and chicken stock,add more salt if needed.Simmer.
5.While chicken is simmering,put garlic cloves,egg yolks,toasted almonds, parsley and saffron in a pestle and mortar and grind together and add a little water.
6.Add to the chicken and leave to simmer till chicken is cooked thoroughly, roughly about 1hr-1hr 20 mins
** This recipe is supposed to be for 4 people, it did 3 of us for 3 meals(I froze the leftovers into two batches)although I suppose my daughter only counts as half a person!!!

When I was looking up typical Andalucian dishes, one of the main dishes that kept cropping up was Oxtail or Rabo de Toro and as this is one of my husband´s favourite meals, I am thinking of tackling that dish in the future and as for the dessert,I still haven´t decided yet,some of my choices are alfajores, amarguillos or poleá but would love to hear from any of my Spanish readers and what they´d reccommend.

2/10/2013

Valentine´s Cupcake Course with La Fábrica & Valen Cupcakes

 Cupcakes are really gaining in popularity here in Spain and now it is possible to participate in cupcake courses even in Ciudad Real.The most recent cupcake course which I took part in, was held in conjunction with La Fábrica, a company which holds various workshops for all manners of crafts and Valen Cupcakes, a self-taught cake decorater, with the topic of Valentine´s Day.

The course started at 11pm and finished at 2pm and was held in La Fábrica. There were about  6 or 7 of us so it was nice to meet other cake fanatics.The course was very professional. Valen,the teacher gave us lots of information and tips about the materials needed, for example the different paper cases, measuring cups and spoons, piping bags and different nozzles, colouring gels, essences available etc. He made some buttercream, which he flavoured with sweet or marshmellow essence and gave us each some buttercream and we coloured our buttercreams various colours with toothpicks.He also gave each of us an icing bag and various nozzles and showed us how  to pipe a rose swirl,stars, leaves and even a rose, depending on which nozzle you used!

We were then let loose to decorate four cupcakes as we wished and unleash our creativity.My mind went blank. First of all, I used my peach buttercream to pipe little swirls. I found that sometimes it wasn´t very neat and was a bit blobby and a bit gappy (which Valen explained was because I was lifting the piping bag too high) so I sprinkled some gold balls over it to try and hide the gaps!!I then had two goes trying to do a rose swirl,one with pink buttercream and the other with white. I was pretty pleased with the end result but wished they were a little neater or more perfect. I topped the pink rose swirl with heart sprinkles and some red edible glitter although I was a bit heavy-handed with it!!Then I piped orange stars around the white swirl and topped it with a single red heart. I also tried my hand at a rose but couldn´t start it off so Valen showed me how to start it off and then I finished off piping the rose. It was not the best rose but for a first attempt,I was quite pleased with it, I then hurriedly piped some green leaves and some swirls in between the leaves. So all in all I was happy with my efforts although I´d have liked a little more time to do the decorating and try and make them neater as I ended up rushing the rose!One girl had not done any decorating before and her cupcakes were much better decorated than mine!!!I really need to practice my piping skills!!

We were given a little booklet with the cupcake and buttercream recipes at the end of the course and a good time was had by all. The course cost 25 euros so was definitely reasonable and well worth the money. I look forward to the next one and would thoroughly reccommend it!

2/05/2013

(Exceedingly good)Cherry Bakewell Tarts (just like Mr Kipling´s!)


Cherry Bakewell Tarts have always been one of my favourite childhood treats....we always used to buy Mr Kipling´s although my Gran made a mean Almond Slice,which was just as good. In fact, there is hardly any difference  between Almond Slices and Cherry Bakewell Tarts, only that one has icing and a glace cherry on the top and the other has flaked almonds. Ever since I made the Almond Slices, I´ve been dying to have a go at Cherry Bakewell Tarts and recapture my memories of lost childhood tastes.

I used the recipe from the blog The Caked Crusader (click on link for recipe) and would definitely reccommend it. As I have limited baking time (I made these while my daughter was sleeping!) I took a shortcut and bought frozen shortcrust pastry and although still delicious,I think these tarts would be even more exquisite with homemade pastry. I also used raspberry jam instead of strawberry and I think you could probably use any jam you fancy or have in your cupboards/fridge...I´d particularly like to use cherry jam to make them taste even more of cherry.I didn´t blind bake the pastry, only pricked it with a fork and there were no soggy bottoms!!! One thing I advise you is not to overfill the pastry case with jam as when they are baking, it causes it to just ooze out which as you can see has happened to one of my tarts in the photo in the top left hand corner (but at least you can more or less hide this with the glace icing!!!)

1/29/2013

Under the Sea Cupcake Course with La Dulce Ambar

 At the end of November,I took part in a cupcake course given by La Dulce Ambar here in Ciudad Real....yes,I´ve only just got round to blogging about my experience. It was held in a house in the country,en route to Carrión de Calatrava, the worst thing about this was the fact that it was very cold in the house (and I´m a real frigolerá!!) and despite the fire, my feet were freezing the whole time.Also,because of the fire it was pretty smoky and my clothes and hair really smelt of smoke afterwards.

There were four of us on the cupcake course and everyone was really friendly.It´s great to meet other people who have the same interests as you and to make new friends. La Dulce Ambar aka María was very informative and helpful and  gave us lots of useful hints and tips. She showed us how to make fondant from scratch although I doubt I´ll be doing this very often, due to the lack of time I have to bake and decorate cakes.I´ll probably stick to bought readymade fondant or sugarpaste.
                                       
 She then showed us how to colour fondant. I coloured mine a light purple colour as purple is my favourite colour and it seemed fitting for an octopus.She then showed us how to form the octopus´s head by making a teardrop,elongated shape and then using sugarcraft tools how to shape the mouth and make two tiny nostrils and impressions where the eyes were going to be. We then got two balls of white fondant which we flattened and stuck on to the head, then did the same with two black balls and then an arch shape in blue for the iris of the eye. I did my quite small as I prefer it to look small and delicate although the smaller the fondant you are working with,the tricker it is to work with and handle. A lot of patience is definitely needed in these cases as it can easily break!
We then rolled out 8 even strips of fondant and bent them to form the octopus´s legs, then let them dry before assembling the octopus on top of the cupcake. It probably took us about 1hour at least just to make the octopus but it looked pretty impressive when it was finished so was well worth it! I nicknamed him Ollie the Octopus!                  
We were then shown how to make various buttercream flavours including cream cheese,lemon and Nutella or Nocilla buttercreams.We then turned to piping,not my best skill and one which definitely needs honing. I can´t remember what nozzle we used but I think it was supposed to turn out looking like waves but mine was  more like frills or ruffles:
   We then had a go at piping the cream cheese buttercream.The course lasted about 41/2 hours, from 10-2.30pm and time was fast running out,plus I had to dash as had booked to eat at La Cabina for my birthday. I had to rush putting my octopus together and then María cut a fondant fish and a starfish out to decorate my other cupcakes with but it was great fun and I learnt a lot. We were also presented with a very professional-looking booklet with the fondant, buttercream and cupcake recipes so it was definitely worth the time and money. I look forward to taking part in more of La Dulce Ambar´s cupcake decorating courses!

1/17/2013

My third Christmas Cake

 Life with a toddler is certainly hectic-I hardly have time to cook or bake,let alone blog. I think I may be starting to sound like a broken record though!! I had to make this year´s Christmas Cake while my mum was visiting so she could look after Chloe while I got on with the cake. I decided to try out this Delia Smith Christmas Cake recipe this year, modifying it slightly as I couldn´t get any currants so added more of the other dried fruits plus apricots.


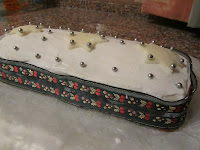
I thought I had dried the cake out a little but over the next couple of weeks until Christmas, it got a liberal soaking in brandy. I didn´t get round to decorating it until Christmas Eve,when we were at my parents´house and my mum could once again take care of Chloe, so I could finish off the cake! The day before Christmas Eve I marzipanned the cake using Dr. Oekter´s ready-to-roll marzipan-no time to make it from scratch just at the moment!- and apricot jam to stick it on.

                                                   
 After leaving it to dry overnight,the following day I made the royal icing and iced the cake, as smoothly as possible! I then cut out some fondant stars with the leftover fondant from my cupcake course and some biscuit cutters and stuck them on the top with a little bit of water.I then decorated the stars and the cake with silver balls. I also stuck a pretty Christmassy ribbon around the cake (I think I added the ribbon directly after icing the cake before adding the stars and silver balls). I think it´s my prettiest Christmas Cake yet and am pleased with the result. i just wish I had more time to practice and make more elaborately decorated cakes!
                                                     
As for the taste of the cake itself, it was a little dry at the ends (my fault or that of my oven!) but lovely and moist in the middle, fruity but not too heavy! I have to say that I think I enjoyed last year´s cake more so I´ll be sticking to that recipe in the future.

1/04/2013

Stars & Moon Cupcakes

December has been a hectic month, what with preparations for Christmas etc,leaving me with little or no time to blog or even to make mince pies and my Christmas cake!!
I just about managed to squeeze in these cupcakes,which I made for a friend´s little boy´s first birthday. The cupcake was a raspberry jammy cupcake, a recipe taken from Hannah Miles´s Big Book of Cakes and Biscuits, with a chocolate buttercream which I found a little too sweet, maybe owing to having run out of Tate and Lyle icing sugar and having to buy a different brand that was actually flavoured with vanilla and not noticing till it was too late! I then coloured some left-over fondant from my cupcake course(this is an upcoming post!) yellow and using my star and moon biscuit cutters,cut out the fondant shapes and placed them on top of the cupcakes and ta-da!!! star and moon cupcakes....made fairly quickly and easily!
 
Related Posts with Thumbnails