11/06/2010

(Not quite Mickey) Mouse Birthday Cake


I decided to make this cake for my niece´s third birthday, based on a cake in my Tartas de Fiesta Infantiles recipe book by Anne Wilson, as she really likes Mickey Mouse and although it´s not quite Mickey, it´s near enough!! I made a plain White sponge cake, following a recipe taken from the Better Homes and Gardens New Cook Book. I then made a simple buttercream to which I added red food colouring to 1/3 cup (although I couldn´t get it to turn out a red colour no matter how much food colouring I added and instead ended up with a dark pink/purpley colour!) and yellow food colouring to the remaining buttercream.

I then covered the top of the cake with the yellow buttercream and then with a chocolate icing pen I had, I piped the outline of the face, the eyes, mouth and eyebrows. I then used chocolate hundreds and thousands/sprinkles to fill in the hairline. Not an easy job as they tended to fall wherever, not where you wanted them to fall! Using a piping bag, I outlined the mouth with the red buttercream and then coloured in the mouth. I then completed the face with large jelly beans for the eyes ( looking back really I think they were too big for the irises!), a marshmellow for the cheek and a blackberry sweet for the nose. The ears were a bit tricky to assemble too. I used 3 digestive biscuits for each ear,which I tried to stick together using the chocolate icing. I also tried to stick a toothpick between the biscuits which I then inserted into the cake, which didn´t work too badly but not as well as I had hoped!

10/24/2010

Pork & Peach Kebabs

I made this awhile ago but just haven´t got round to blogging about it until now. Unfortunately, I only have the one photo as we were starving and it was all we could do not to gobble it up, then and there! This is a recipe adapted from quite an old book, which I found in the library, called Miss Read´s Country Cooking and I think it´s a British recipe.


Ingredients: (to serve 2)

1/2 lb (around 230g) pork fillet/tenderloin,cubed

1/2 green pepper, chopped into thick squares

about 2-4 canned peach halves, quartered

1/8 pt peach juice (from canned peaches)

4-6 button mushrooms

1/8 pt water

juice from 1/2 lemon

1/2 tbsp of soy sauce

salt & pepper to taste

1/2 tbsp cornflour/cornstarch

4 wooden skewers

Method

1.Soak skewers in water to prevent them from burning. Chop all ingredients.

2. Blanch mushrooms and pepper in boiling water for about 5 mins.

3. Thread pork, peach halves, pepper and mushrooms onto skewers. Brush with olive oil and place in oven under the grill for about 20-30 mins. During this time baste with oil frequently and turn kebabs to cook them evenly.

4.Heat peach juice, water, lemon juice & soy sauce.

5. Mix cornflour with a little water and peach juice to make paste.

6. Pour peach & soy sauce mixture into paste and mix, then return it to the pan and cook for 5 mins, stirring continuously till sauce thickens. Season with salt and pepper.

7. Serve kebabs with rice or potatoes and vegetables and drizzle peach sauce on top of the kebabs.

10/17/2010

Buttercream Cake-Decorating Course

I took part in my second cake-decorating course held at Fabricando Delicias, this time about Buttercream. Our instructor was Jose, one of the owners of the shop, who is a very patient teacher and gave us very clear explanations and demonstrations. The course was held over two Saturdays from 10am-2pm and cost a reasonable 50 euros,plus materials.
In the first lesson, José showed us how to prepare buttercream to various consistencies depending on the type of decorations you were going to use it for (recipes are also included in the instruction booklet to accompany the course). He then showed us how to make icing bags out of baking paper...a little tricky as I´ve never been one for handicrafts! We then learnt how to use the icing bags to pipe stars, a wavy line, tight zigzags, dots and figure piping using plastic templates which we were allowed to keep (great for further practice). We made a face although I didn´t get very far with the hair! He also showed us how to pipe a heart although I didn´t have time to try piping a heart. We also had a go at piping writing, which was also fairly tricky. We were given a muffin ,which we could decorate with buttercream and quite a few of us had a go at using the grass effect nozzle, then decorated the muffins with the faces we´d piped (as you can see in the final photo).

The following Saturday we had to bring a cake with us to decorate. I just made a plain Yellow Sponge Cake but unfortunately I had a bit of a disaster and the cake stuck to the bottom of the cake tin. It was a new cake tin so not sure if that had something to do with it so it was a bit uneven. We also had to prepare Buttercream of two different consistencies but I had another disaster and only brought one kind. I made the stiff consistency to the recipe given in the instruction booklet but it ended up looking like breadcrumbs so I added 2 tbsp milk and it seemed better. However, José said it was too still dense and added water to it till it was much more manageable. I think my problem was that I didn´t leave the butter out of the fridge long enough before making the buttercream.
José showed us how to level off our cakes using a cake leveler and then we piped on the buttercream, then used the spatula to smooth it over. We then practised piping star flowers (for me perhaps one of the easiest things so far!)and swirl flowers, shells (which are also fairly complicated). Using a flower nail, we stuck some sticky tape and baking paper over the nail and practiced making cone shapes, then once we had a half-decent cone, José showed us the next steps of how to pipe a rose. It is really difficult and hardly any of us accomplished a complete rose. You definitely need lots of practice and plenty of patience!
We then went on to decorate our cakes, a bit on the rushed side as time was running out. With piping gel, which is much easier to pipe than buttercream, we traced the outline of a Hello Kitty template and then placed it on top of the cake and using a wet paintbrush went over the lines till the pattern was traced on the cake. Then, with chocolate or black buttercream we piped the outline. As we were running short of time, I also piped the eyes and nose in chocolate buttercream. Then, using the star nozzle and pink buttercream, I filled in the dress and flower with pink stars and voíla a fairly impressive Hello Kitty cake for a novice cake decorater (as can be seen in the first photo above)! The middle photo is of the teacher, José´s cake! Using a piping bag is very difficult as I´ve found out and my common problem was that I often held the bag too high up, which meant I had to use more force than necessary to squeeze out the buttercream. My hand and wrist were often aching by the end of the course! Or maybe I just need more strength!


I took part in my second cake decorating course at Fabricando Delicias

10/10/2010

Shan: Possibly the best Asian restaurant in Ciudad Real or even in Spain!

I love Asian food and have been to quite a few Chinese/Asian restaurants in Spain, particularly in Ciudad Real.However, I have often found Chinese/Asian restaurants to be quite disappointing in Spain as they tend to be seen as a cheap alternative for eating out and the quality and choice of dishes can be very limited compared to in the UK. I tend to find Chinese or Asian food in Spain has been adapted significantly for the Spanish palettes or that many dishes are simply not on Chinese restaurant menus here and I find it less authentic.

Until I discovered, Shan Cocina Asiática restaurant that is! Shan restaurant can be found in the city centre on Avda de la Mancha 5 in Ciudad Real. It is a spacious restaurant, very clean and nicely-decorated. It is an Asian restaurant, as opposed to a Chinese restaurant, which means that as well as the usual typical Chinese dishes, it also does some dishes from other Asian cuisines, such as sushi, Thai red curry, Vietnamese spring rolls etc.

All the food is of good quality, flavourful and authentic tasting. Our favourites include the restaurants speciality dish of chicken or beef in Thai red curry, beef in Tien-Ban sauce, ham knuckle or hock Shan-style (with a lovely tasting sauce made from five-spice I think...it reminds me a little of crispy duck too),Wok-style rice noodles (with a lovely spicy Thai-style sauce). We went last night for dinner and ordered some of our favourite dishes, the Vietnamese spring rolls as a starter, fried and bursting with mince pork, carrots, cabbage, Chinese mushrooms, agar-agar, served on a lettuce leaf with a sweet-sour sauce. Then, we had the Thai Wok-style rice noodles to follow and tried a new dish, Sizzling Duck of the house. The Sizzling Duck consisted of a lovely tender and juicy duck breast cooked to perfection, with crispy skin in a brown sauce and onions, served on a sizzling hotplate. Absolutely delicious!Even my husband, who is not that keen on duck, thoroughly enjoyed this dish. We have never had a bad meal or dish at this restaurant.

I´d reccomend fried ice-cream for dessert if you fancy something sweet. The restaurant usually throws in free prawn crackers and an after-dinner chupito (shot). Service is very good, the waiters/waitresses are very friendly and the food is very prompt. It is also very reasonably priced with dishes costing between 4.45 euros to the speciality dishes and duck ,which although slightly more expensive are still very reasonable, from 8.25 -10.95 euros. If you prefer to eat at home, you can also choose to get a takeaway or order it over the phone and have it delivered to your door!

My only concern is that this wonderful restaurant is often empty, which I cannot understand as it is definitely the best Chinese/Asian restaurant I have eaten at in Ciudad Real and maybe even in Spain! Do people just not know about it or is it too authentic tasting for Spanish palettes?I really would find it a great shame if this restaurant were to close.

9/27/2010

Fondant Cake Decorating Course


Last week I took part in my first fondant cake decorating course held at Fabricando Delicias. The course was held on Wednesday evening from 5pm to 9pm and Saturday morning 10am -2pm for four hours. It was well worth the money as it cost 50 Euros for the course although you had to pay for the materials apart. Luckily I had quite a few of the decorating equipment & tools already so I didn´t have to spend a fortune.

Unfortunately I had to work on Wednesday evening so missed the first two hours of the course during which they made a snail and a frog....I intend to make these myself at home to practice. We then made a dog and an angel but time flies so quickly when you´re having fun that we didn´t have time to finish the angel and give her wings and hands. We also ran out of time to make the clown, which we could do at home if we wanted. Here are my efforts:

We made the figures out of modelling paste and it was a lot more difficult than I imagined because the modelling paste kept cracking and drying very quickly so you have to work as quickly as possible and keep kneading it to keep it soft and supple and more like Plastaline. I think they look quite cute, don´t you? Obviously I need a lot more practice though! It took me ages to colour the modelling paste at home and even though I wore gloves I still ended up with icing food colour all over my hands and my clown became a little smudged. He looks a bit like a snowman as he´s so white...I still need to give him a hat and a tie and maybe give him some more colour or stripes on his body so he looks less like a snowman!

On Saturday morning we learnt how to make fondant roses, a daisy like flower and a carnation. I think the rose and the daisy turned out well but the carnation was a disaster. More practice definitely needed! We also had to bring a cake to decorate and as I didn´t have time to make one I just bought the sponge bases from the supermarket. We learnt about different fillings you can use in the cakes. I just used raspberry jam to fill my sponge layers like a traditional Victoria sponge cake and then covered the cake in apricot jam to stick the fondant. We also learnt how to work the fondant before rolling it out, how to roll it out and cover the cake. One of the biggest problems was that the fondant tended to stick to the Roll n´Cut Mat and because of this my fondant seemed to tear or crack more easily. However, I think for a first attempt it was not bad. Here´s a photo of my cake with the rose, the daisy (you can just make it out) and the angel on it.


Below is another of the student´s cake decorated with her clown, which was very good and artistic.


The course was very informative and the teacher was very helpful. I´d definitely reccomend anyone interested in cake decorating to do a course. I´m looking forward to the next one about buttercream, which I´ve already signed up for!


9/21/2010

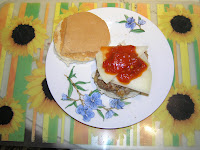
Don Quijote Burger


My inspiration for this burger was during my time in the States, I often liked to watch the Food Network Challenge and one day there was a burger cook-off. It got me thinking about what kind of burger would represent the region where I´m living in Spain (Castilla-La Mancha). As the lamb here is famous for being very good, there was no doubt that the burger had to be a lamb burger. I also decided to add one or two other typical regional delicacies and here is the recipe I came up with and it turned out to be pretty tasty even if I do say so myself! I named this the Don Quijote burger as Don Quijote is set in Castilla-La Mancha and almost everything here is named after him!! Here in Spain it is very difficult to find lamb mince and I had to ask the butcher to mince a bit of a leg of lamb and he wanted to mince it with a bit of pork, apparently so it didn´t get stuck in the machine and make the mincer taste of lamb! Unfortunately I didn´t write down the amounts of what I used but this is more or less the amount I used.

Ingredients (for 2 people)

1 loaf of rustic bread, cut into two rounds or 2 rustic bread buns
200g minced lamb
1/2 small onion, finely chopped
1 clove of garlic, finely chopped
a pinch of salt & pepper
1-2 tsp of frozen or dried parsley
1/4 tsp dried rosemary, crushed
about 1/8 cup of fine breadcrumbs
half a beaten egg
flour to coat/bind
4 slices of Manchego cheese
2-4 tbsps/dollops of ready-prepared or homemade asadillo (if you can´t buy asadillo where you live, I´ll try and post the recipe asap although I used store bought asadillo to save time)
abundant olive oil for frying

Method

1. After chopping the onion and garlic, add to mince.
2. Add salt, pepper, parsley, rosemary,breadcrumbs and egg and combine.
3. Form into two patty shapes about 1-2 inches think. It will probably be a bit sticky so roll in flour to coat till patty is firm.
4. Fry in abundant olive oil till burger is cooked through.(this could also be grilled maybe to make it more healthy)
5. While burger is cooking, toast buns/ bread rounds.
6.Place burger on bun, place 2 slices of Manchego cheese on top and then 2-4 big dollops of asadillo.
7.Enjoy!

9/09/2010

Easy Chocolate Refrigerator Cake otherwise known as Tiffin

I felt like cooking this the other day as it was one of my favourite treats when I was a child that my Gran made me...In fact, this is actually her recipe. It´s also a treat which is great to make with children due to its easy preparation and it is also very safe as it doesn´t entail too much work with hot ovens or sharp utensils such as knives. Choc-a -block with hazelnuts, raisins,biscuits and chocolate, it´s perfect to drive away those sugar cravings.

Ingredients

6oz (about 170g) crushed digestive biscuits

2oz (about 56g)hazelnuts, chopped

2oz (about 56g) seedless raisins

2oz (about 56g) plain chocolate

2tbsp golden syrup

3oz (about 85g) butter

Method

1. Melt chocolate, syrup and butter in pan over a low heat as shown in the photo:

2. Take off heat, add biscuits, nuts and raisins and stir till combined.

3.Press into a square 7 inch tin, cut into squares, place in fridge and leave to harden.

I think you could maybe try using different types of nuts, dried fruit eg cranberries and different biscuits as variations of this recipe.


Related Posts with Thumbnails